Building a MS Teams Status Cube with the Graph API Presence Subscriptions
Microsoft teams displays a small icon to show if you are busy, available, away and other statuses. Using the Microsoft Graph API we can be notified when this status has changed and in turn update a light in another room.
Inspiration
Over the last few years, there have been many different lights that reflect status in chat applications. Most notable were Elio Struyf Status Light that uses a HomeBridge on Raspberry Pi with a Unicorn pHAT and Scott Hanselmans integration into his Philips Hue lighting system. These use the MS Graph API to poll for the presence status every few minutes.
At the end of 2020 Microsoft updated the MS Graph API extended the subscription API endpoint to include subscriptions to a users presence. The new endpoint means a lot fewer API calls near real-time updates. This new endpoint prompted me to revisit the project and create a wooden status cube based on the new API.
This project has been built on the work of many others and I would like to thank them for sharing their learnings online that allowed me to build on top of. Most notably the subscription target component is based on Jan Vidar Elven post on Subscribing to teams presence with graph api using power platform.
High Level Overview
Early on it was decided to use Azure logic apps, reducing the amount of code and simplifying the build. The project is made up of a few steps; Initial OAuth Token, Subscription, Subscription Target and the USB light.
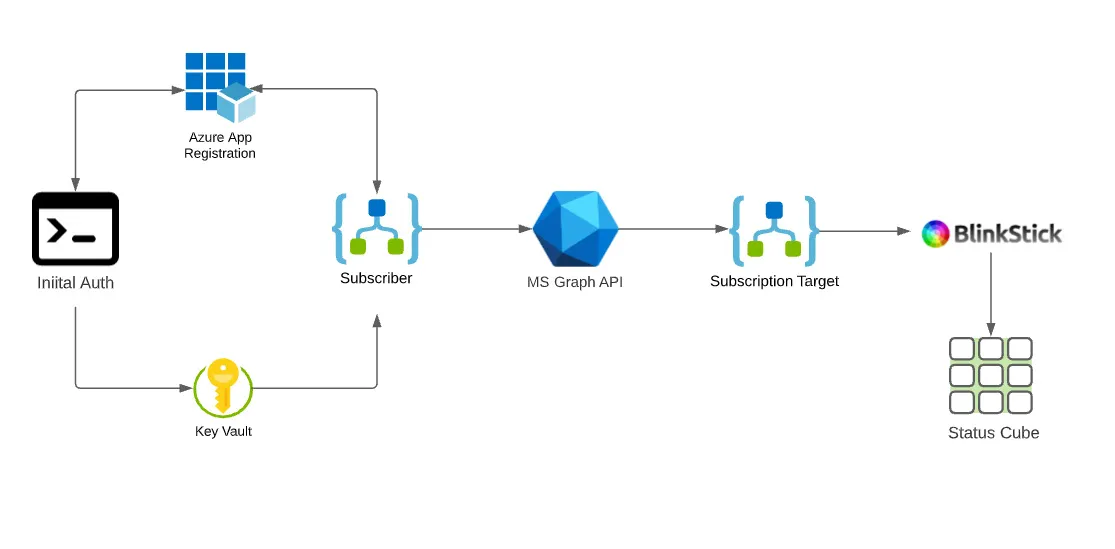
To access the Graph API an OAuth Token is required. The subscription endpoint requires that token to be user level access rather than an application, this rules out many OAuth flows. As all API calls are via Azure logic apps, they don’t have a UI needed for a user-level token grants so the process starts in a console app. This one off application gains a delegated user level token and stores both the token and refresh token in Key Vault.
The subscriber logic app either sets up or renews the subscription in the Graph API using the OAuthToken, URL of the target and a shared secret stored in the KeyVault. The maximum expiry on the subscription is an hour so the app runs on a schedule and ensures we continue to be subscribed and notified of new changes.
When a status change happens the subscription in the Microsoft Graph API will then notify all the subscribed HTTP endpoints, in our case another logic app. After checking the shared secret is as expected the logic app can then decide what to do with the new status.
I had originally planned to use Azure IoT and WS2812 lights however I already had a USB Blink Stick USB light so decided to make use of it instead. As part of BlinkStick they offer a HTTP endpoint that you can post colour changes to, then write apps that can subscribe to those changes over WebSockets simplifying the end part of the project.
This is the result of the final project working, The rest of this guide breaks down in more detail each of these components.
App Registration and Auth
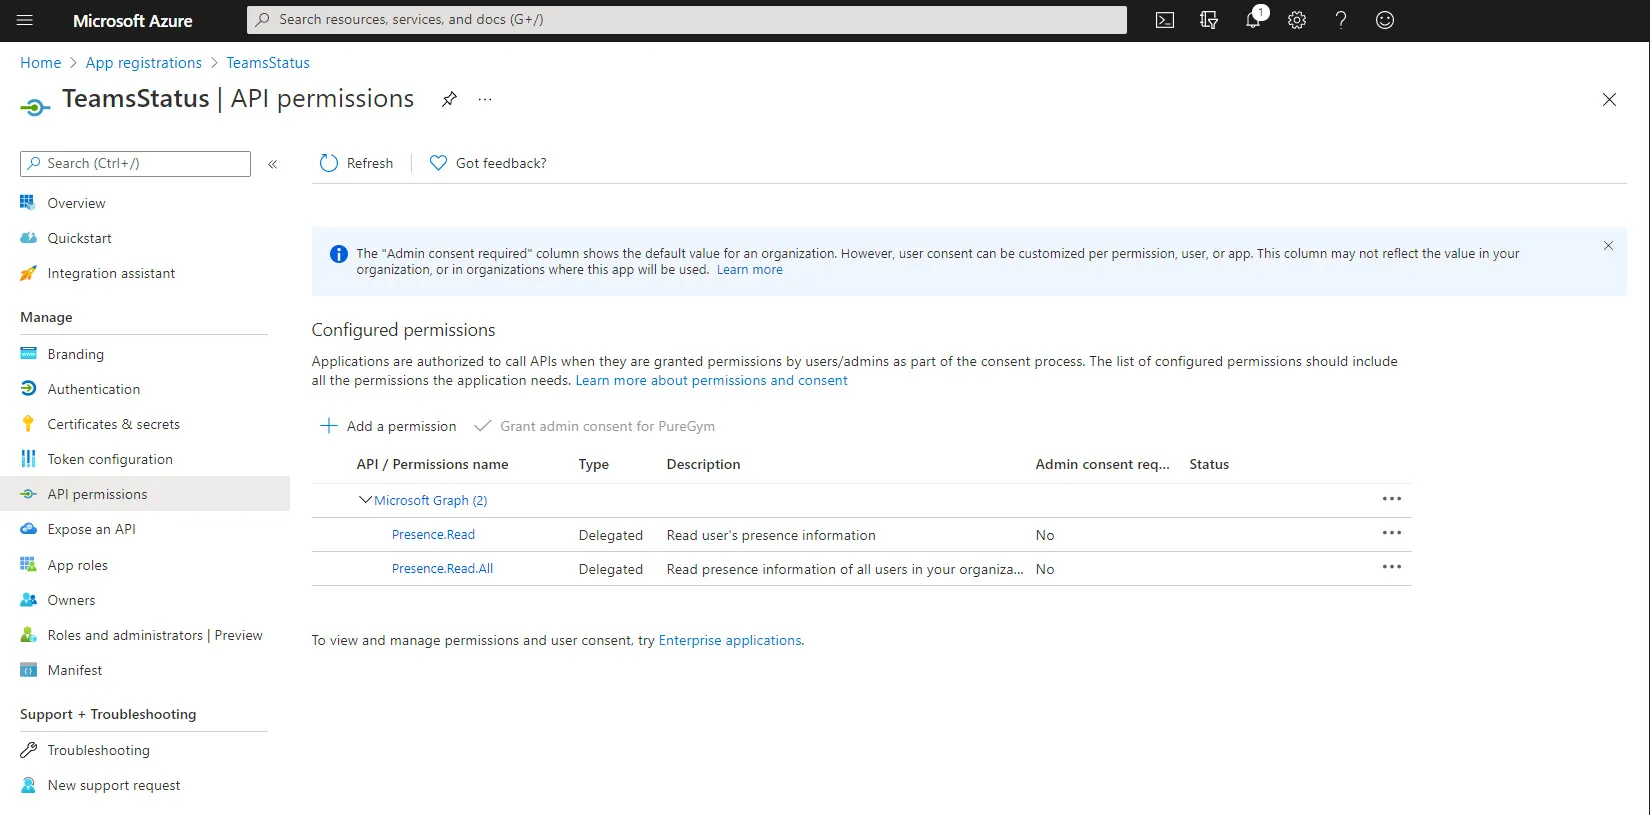
In order to access the Microsoft Graph API an OAuth token is needed and for the subscription API endpoint this needs to be a delegated OAuth token from a user. The first step is to create an application registration in your Azure tenant. You can then use the application Id to request an OAuth token later in the process.
Two permissions need to be configured against the application registration; Presence.Read and Presence.Read.All. These are both delegated and do not require admin consent.
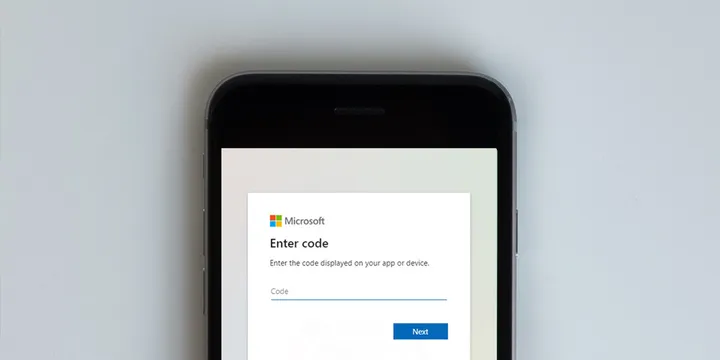
To make the initial request a console app uses a device code OAuth flow to prompt the user, gain the token and store in Key Vault. Once this has been stored further requests can use the refresh token so the user does not need to be prompted again.
Subscription Target Part 1
Before we can subscribe to any event on the subscription API we have to have created the target HTTP endpoint that will be notified of events. This target endpoint must respond with a 200 status code when the subscription is created otherwise subscribing will fail.
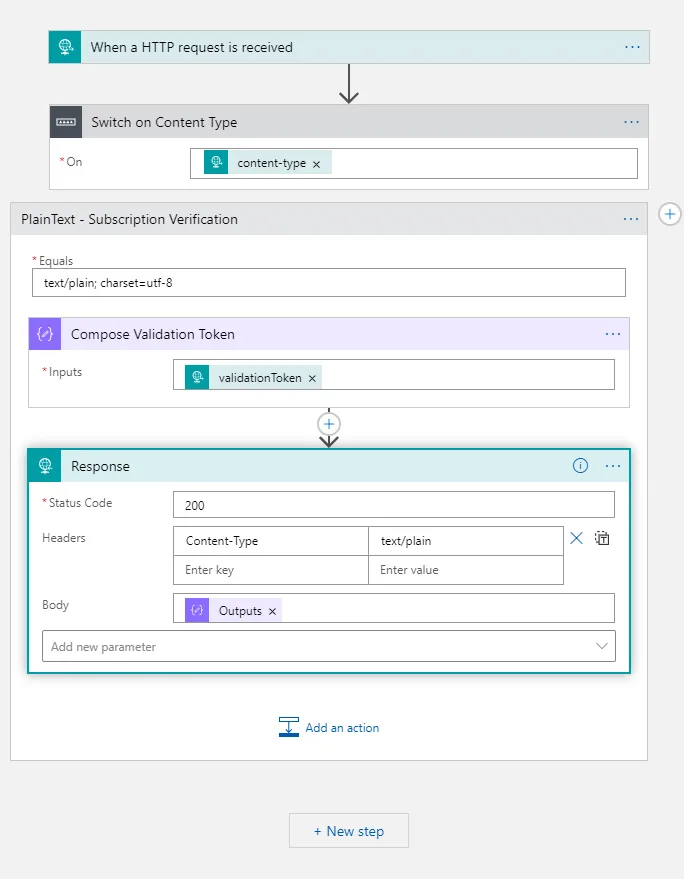
The Subscription Target end point is used for both initial verification and then later for notification of events. If the request that comes in is plain text then this is the subscription verification request and we need to respond with a simple 200 and the token from the request. If the data that is received is JSON this is an event. We will cover this in Subscription Target Part 2 later in this post. For now all that is needed is to respond with a 200 status code.
Subscriber App
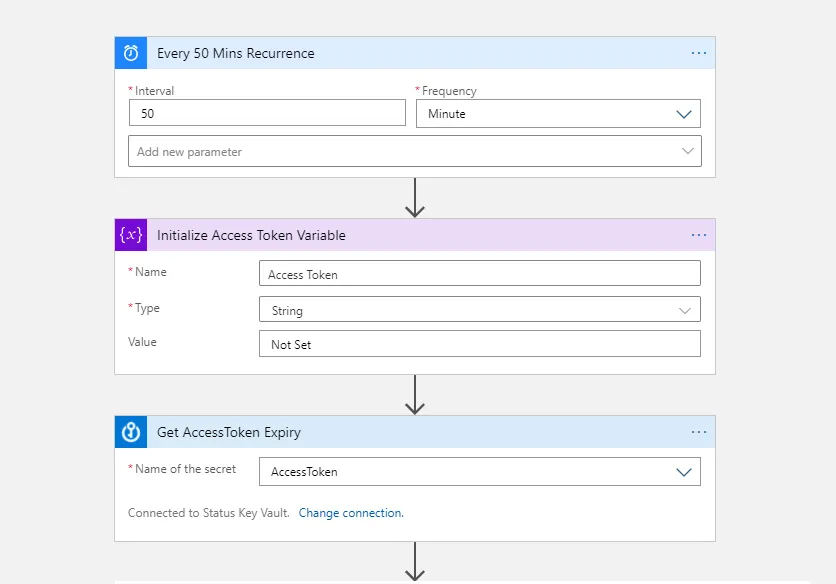
You can currently subscribe to events for a maximum of an hour, so it is the job of the subscriber logic app to ensure we are always subscribed. The basic flow in the logic app is on a timer trigger, scheduled every 50 minutes running through the following:
- Retrieve the current OAuth token
- Check the OAuth token has not expired
- If expired, retrieve a new token
- Get a list of Subscriptions and Filter
- Either create a new subscription or renew the subscription
The calls to the Graph API are done via a HTTP call. It is not possible to use the new MS Graph Security Connector (preview) as this uses application rather than delegated permissions which do not work with the subscription API.
This is a complex set of steps so now lets take a look at each of these in more detail…
Retrieve the current OAuth token
After the timer trigger, a variable is setup ready to use later. The first action is to retrieve the access token exipry from Key Vault using the Key Vault connector.
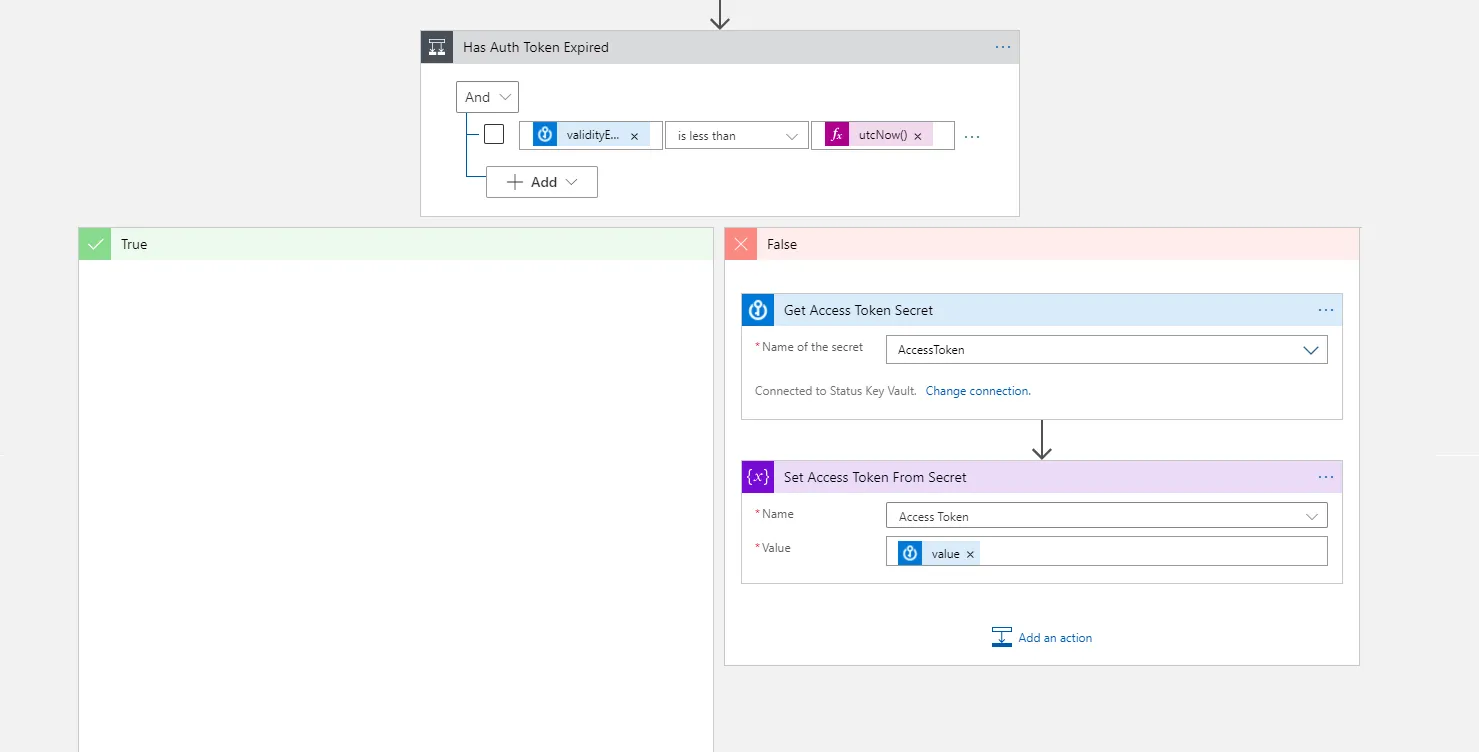
Check the OAuth token has not expired
Like the subscription itself the OAuth token has a short life. The expiry of the token has been set as the expiry for the secret in key vault making it easy to check. If the token has not expired, fetch the Access Token secret and store it in the variable ready to use in the API calls.
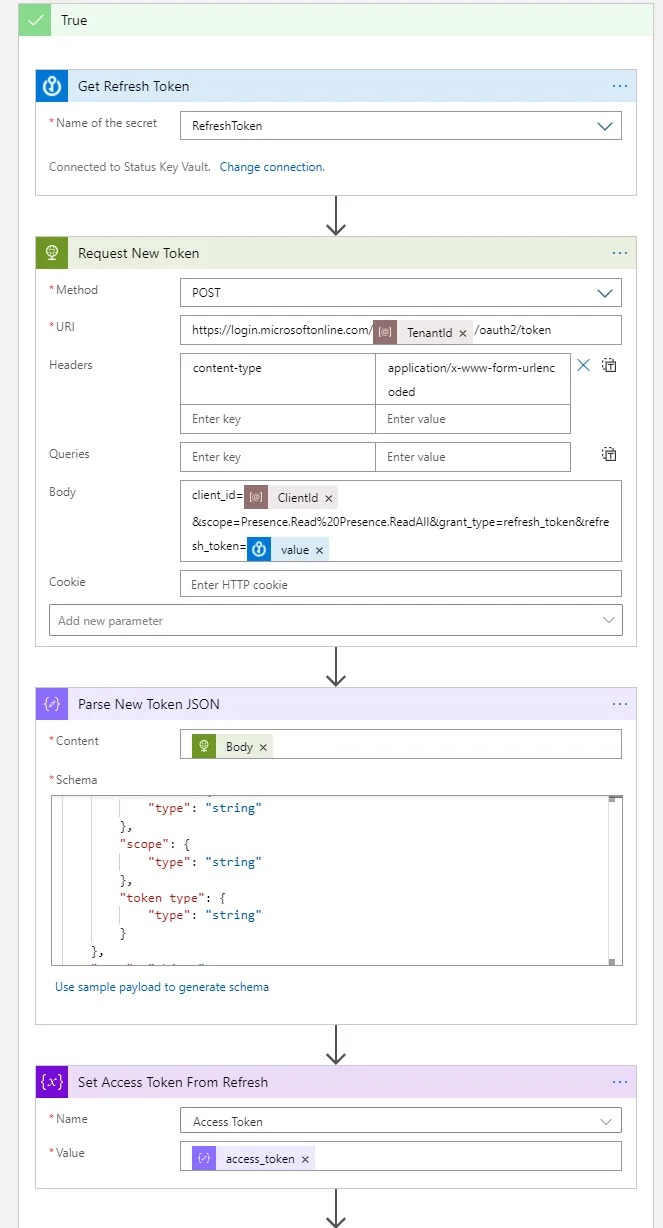
Retrieve a new token
Should the token have expired, a new token can be retrieved using the refresh token. This has to all be done via REST API calls rather that built in connectors due to the need for a user level delegated token. The token is then stored in the variable we setup ready to use in the API calls.
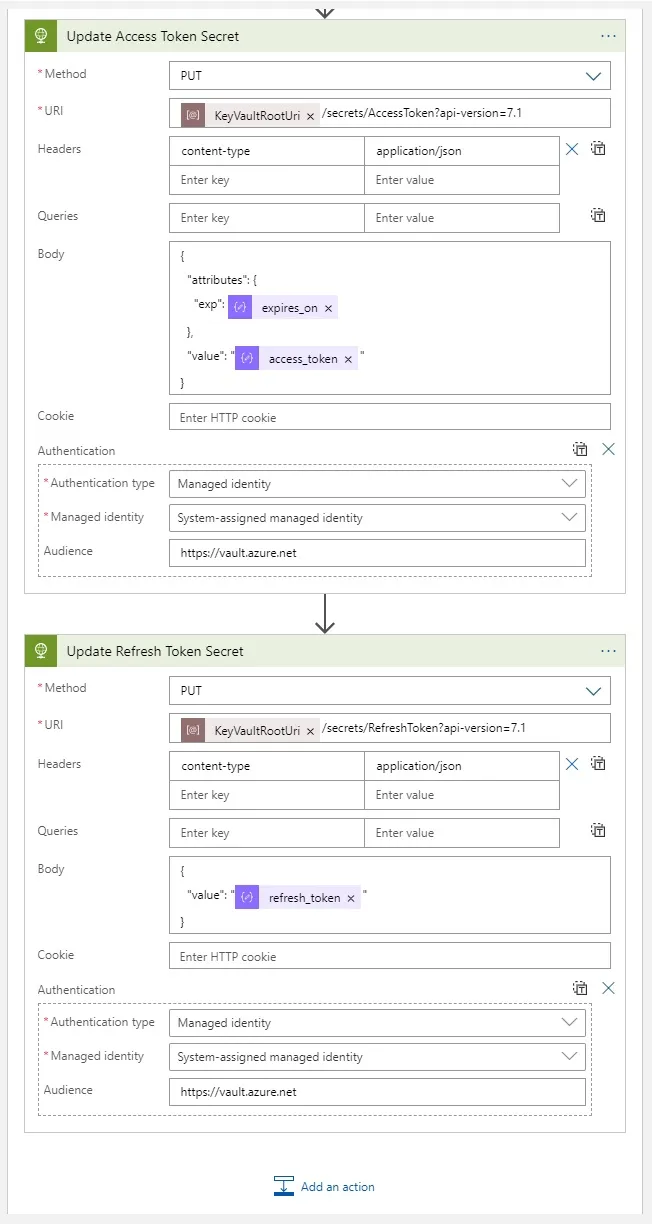
Store the new values
The new values need to be saved for next run. The key vault connector only supports reads however we can use standard REST API calls and the system manged identity to save the values.
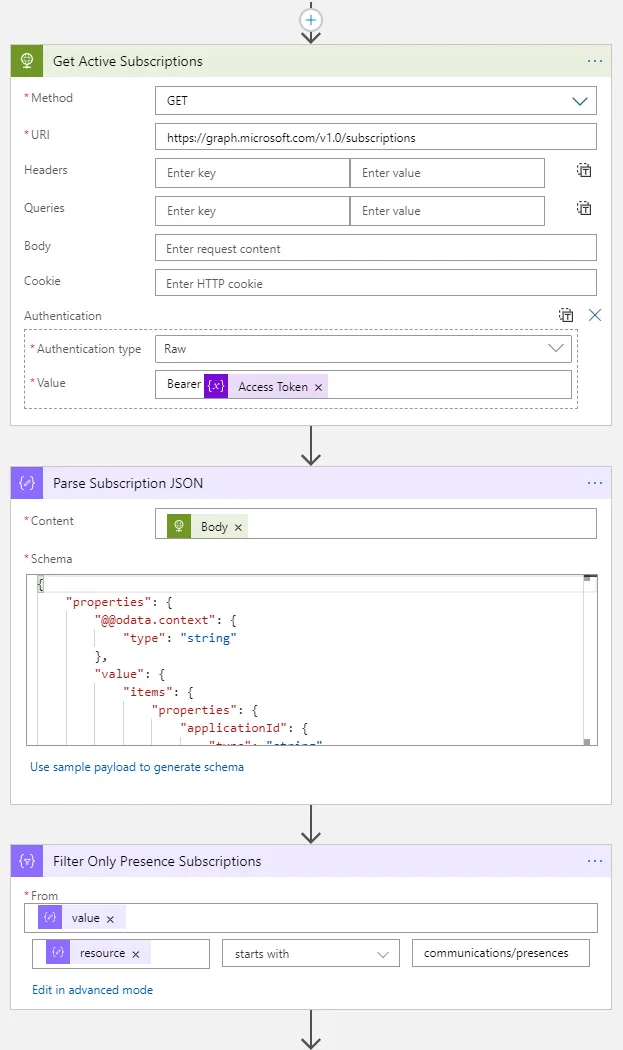
Get a list of Presence Subscriptions
In order to decide if to renew a subscription that is yet to expire or setup a new one we must fetch the list of subscriptions. You can subscribe to many events so the list must be filtered.
Create or Renew a subscription
The subscription is created with parameters for a shared secret, target notification URL and the user who you would like the notifications for. The secret is a string value that you can check when receiving a notification at the target URL.

Subscription Target Part 2
Now the subscription is set up any changes in status will be sent to the subscription target in JSON format.
This logic app would not have been possible without Jan Vidar Elven post on subscribing to teams presence with graph API using power platform. This covers the logic in this subscription target in detail, though not the refreshing of the subscription or managing auth tokens.
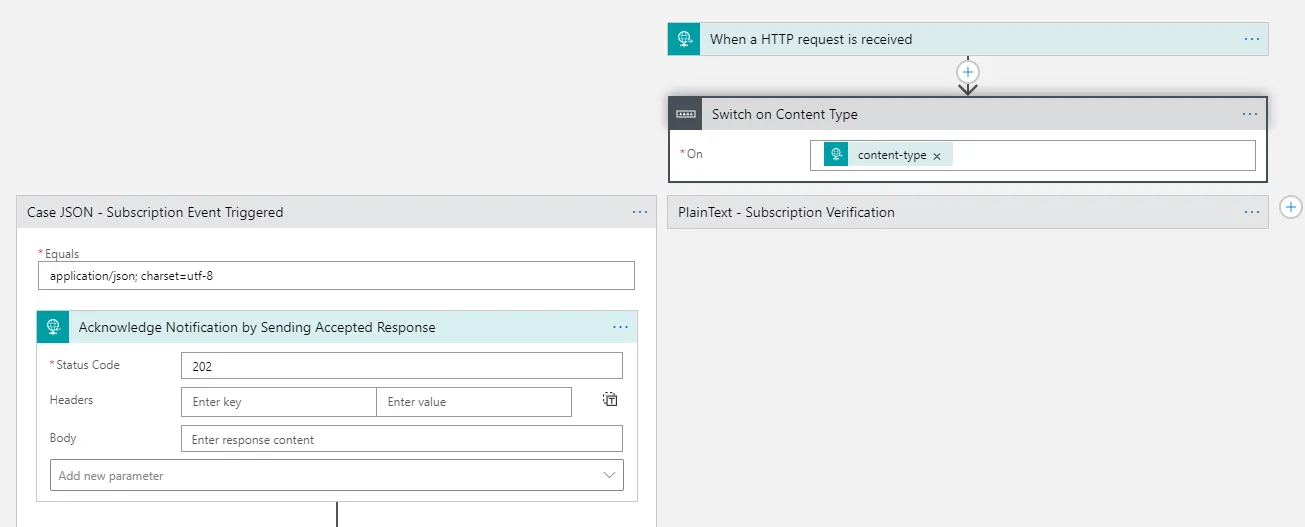
When an HTTP request is received to logic flows:
- Check if the request is JSON or Plain Text
- If Plain text return a 200 (as per Subscription Target Logic App Part 1)
- If JSON then send a quick 202 response to acknowledge
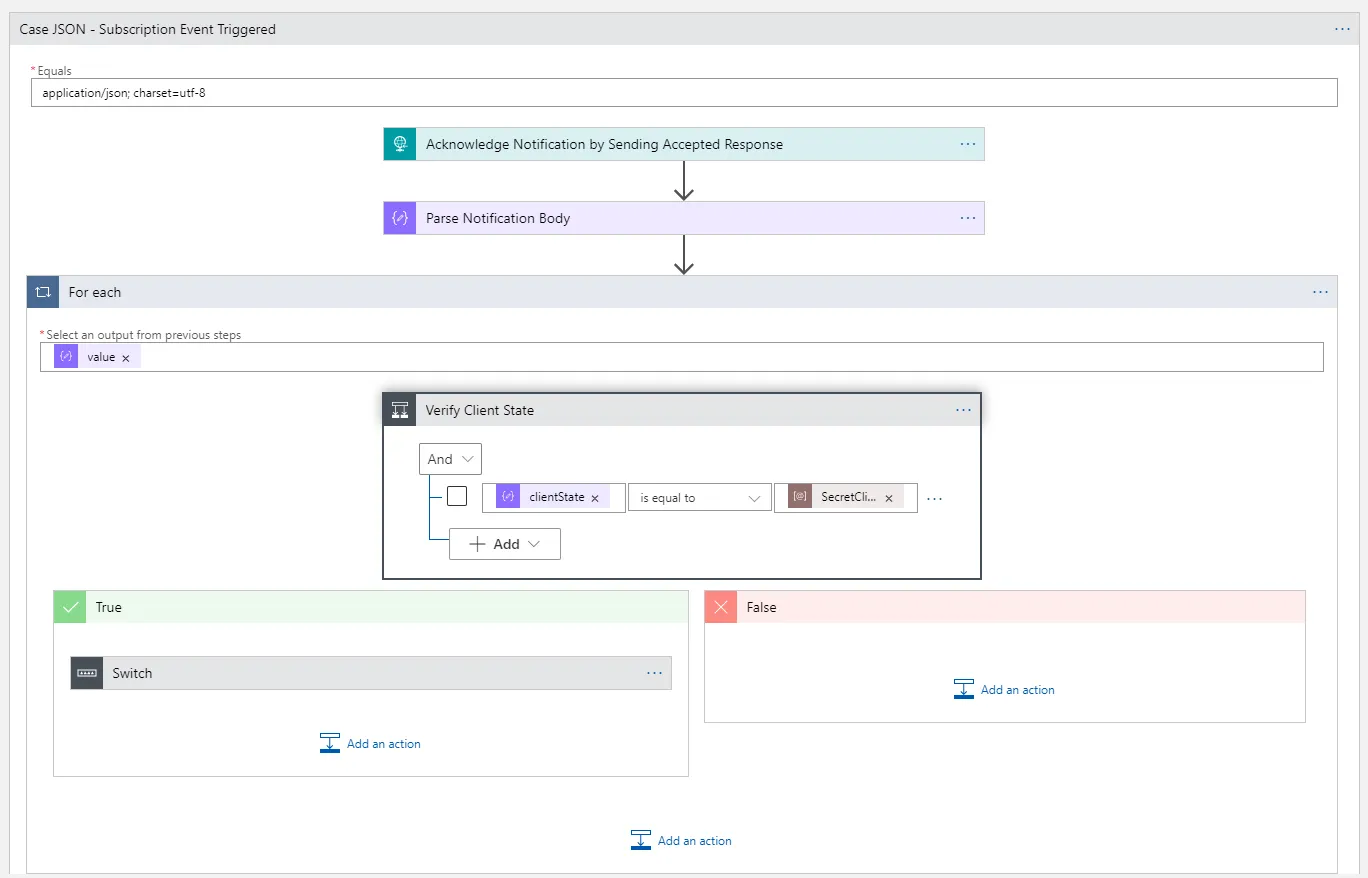
- Parse the JSON
- Loop through each of the events in the value array property of the JSON
- Validate the client state secret is the same as what was registered
- Make a call to a new HTTP endpoint to update the light colour dependant on the new status
This second logic app is much simpler however lets take a look at some of these steps in more detail…
Acknowledge response
It is important to return with an acknowledge response as the first step.
Validate the Client State Secret
For each event the Client State Secret set when we created the subscription is checked to make sure it is a valid request.
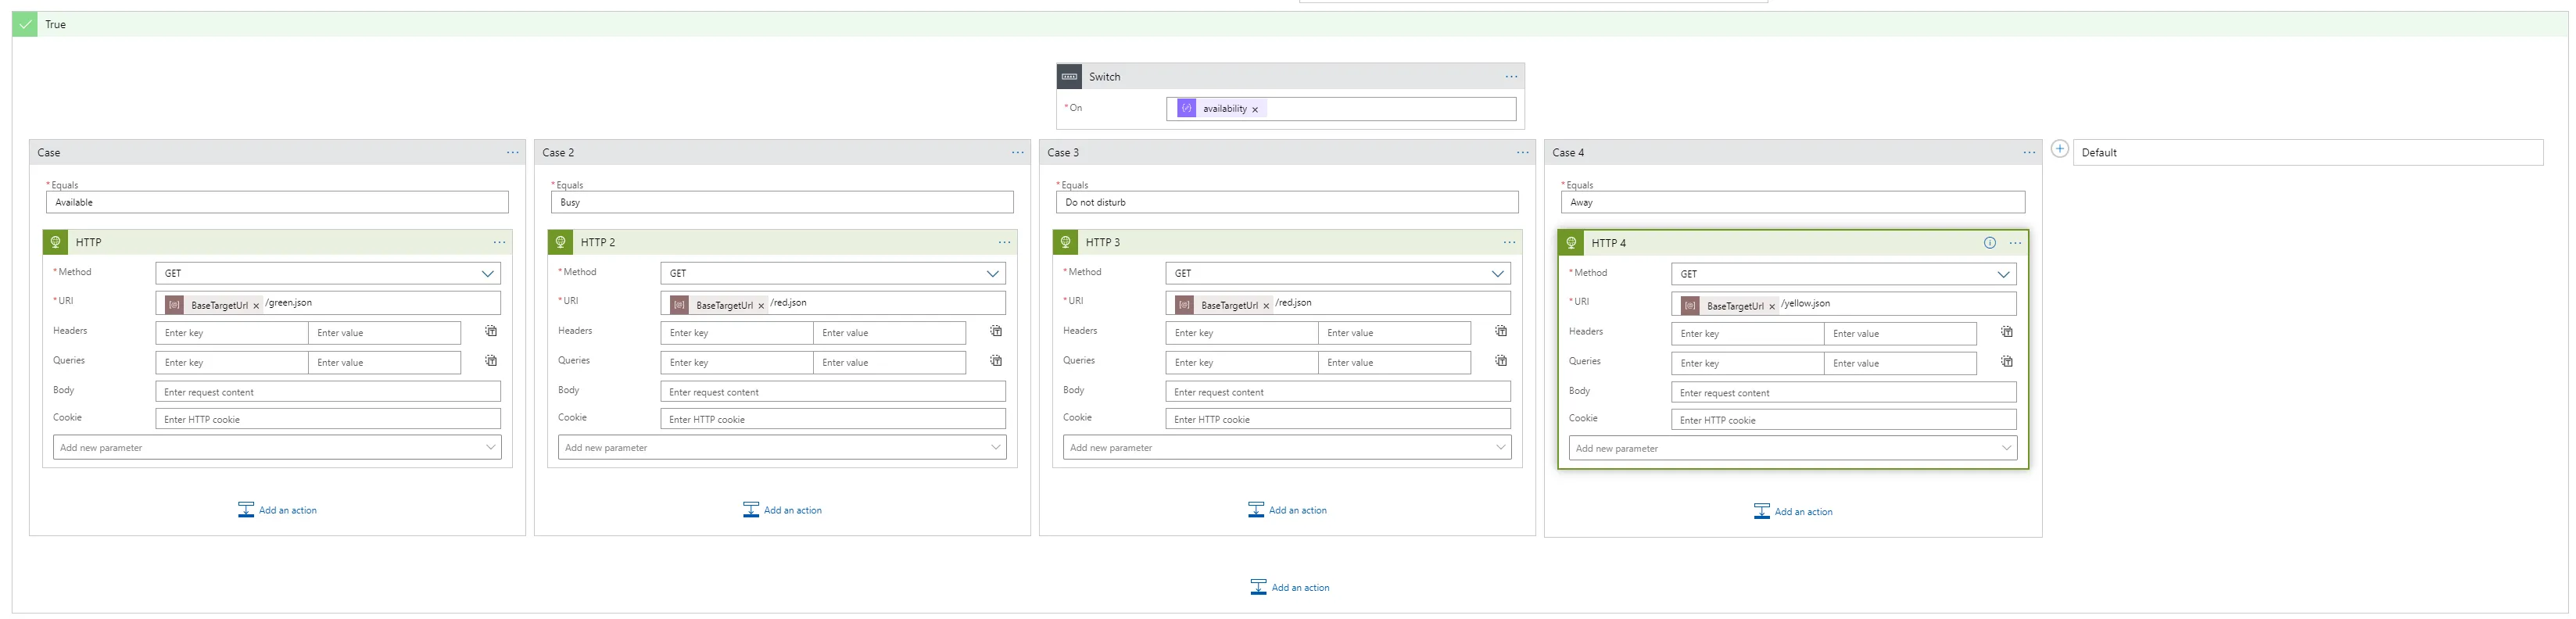
Send Status to Update the Light
The event provides tha status (e.g. on a call) and availability (available, busy etc.). Based on the availability value a different end point is hit to change the light colour.
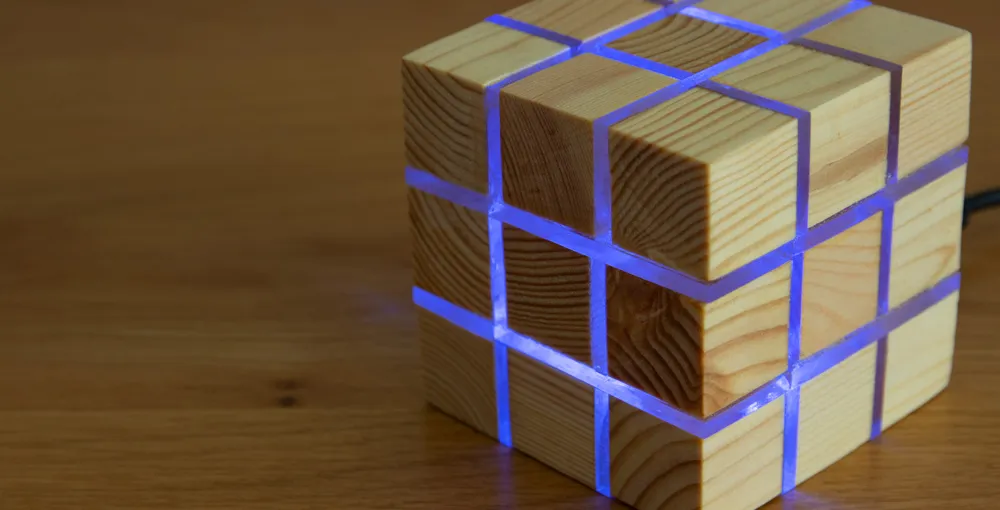
Building the Cube
Initial thoughts were to have a small light to sit on my desk but also would not look out of place elsewhere in the house. I searched through Pinterest and reviewed many ideas that I could build with my limited skills.
I landed on the design of RepRevMakes LED lamp made of wood and acrylic however the building guide involved a circular saw and was too large for my needs.
Inspired by the look I took the overall concept and after creating a 3D model workout how to create a scaled-down cube of pre-cut pieces that required no power tools and could be assembled easily. I have fully documented the process on Instructables and created this short assembly video for anyone interested in building their own.
If you do build your own or have feedback on the cube build you can comment and share you own pictures on the Mini Light cube Instructables page.
Lighting the Cube
For the light, I decided to use a blink stick that I already had. This is a low-cost small circuit board with USB connection and a single light pixel. It can be programmed directly using their APIs to change the colour however another feature is that you can register your blink stick and receive a public URL to update the colour. You can write an app to subscribe and receive the updates to change the light.
The logic app was set up to hit the public URL and I inserted the stick into the cube. The code I used for the app which subscribed was unchanged from the sample code blink stick provide.
Improvements
Overall it has worked well but like any project, we can look back at what we would do differently with the benefit of hindsight.
Logic apps seemed like a good fit through the subscriber logic app became very complex. One option would have been to extract some of this out into a custom connector or move it into an azure function. If there was an MS graph connector that would act with delegated permissions it would have made it all simpler.
The cube itself worked well though a small improvement would be to leave out a cube on the lower layer to allow wires to come out rather than cutting a hole after it is built. The Blink stick light works though I will probably go back and replace it with a strip of WS2812 lights to make it brighter.
Summary
After being inspired by other builds I decided to build the Microsoft teams status cube. The new MS Graph API subscription API allows for near real-time updates which are subscribed to and managed by two logic apps. This then pushes updates to BlinkStick.com that intern alerts an app via WebSockets that updates the USB light inside the cube.
The build instructions for the cube on Instructables.