Reading Google Calendar Events in an Azure Function

I recently had the need to look at how to read Google Calendar events from inside an Azure function, however it’s not been as straight forward as I initially thought. Having struggled through many different versions of the Google APIs and different technical approaches I settled on the solution which I will share in this post. The Azure functions in this post are written in JavaScript using NodeJS however you should be able to use the same techniques in any supported language.
The technique uses a server-side OAuth 2.0 authorization code flow. This is needed as we require an offline token to use at times when the user is not present.
Navigating to the first Azure function through a link placed on our website the function redirects the user to the google consent page. After consent the user is redirected back to the azure function which lets us obtain the token. We store this token along with an offline refresh token to be later used. The user is then finally redirected back to a webpage on the main website.
The second Azure function retrieves the tokens from key vault. These are then used to access the calendar API reading recent events on a timer.
Setting up your Account
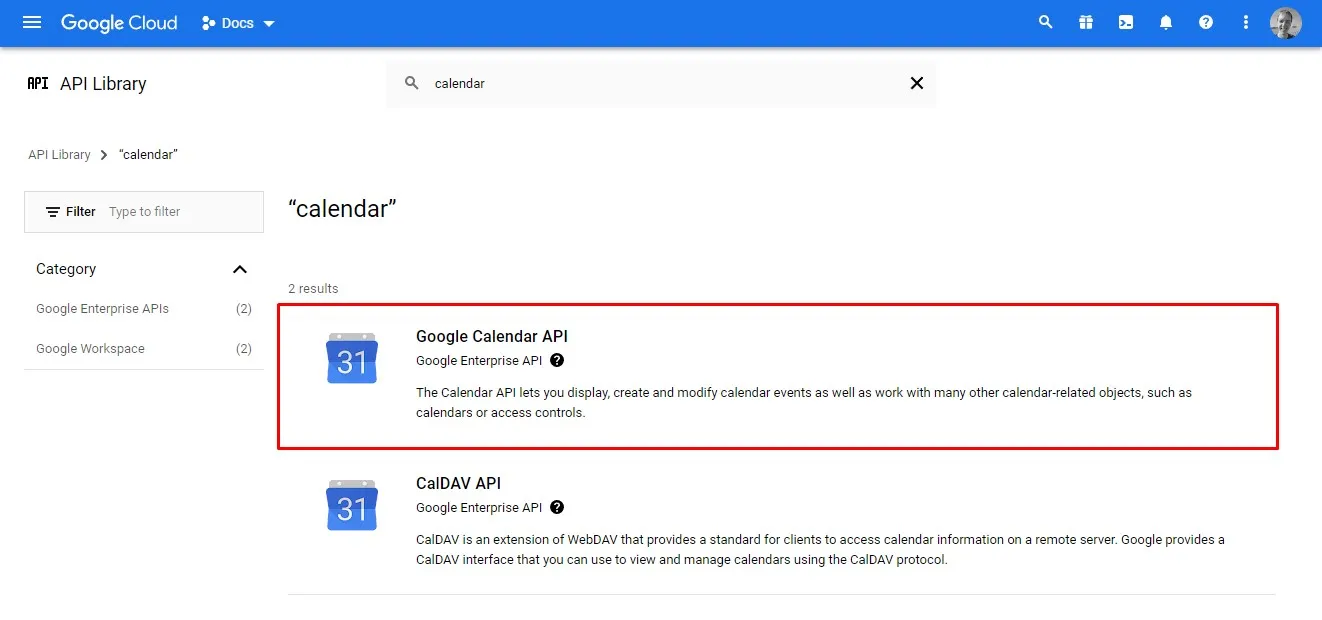
Before we get too far the first task is to configure our Google API access in the Google Cloud Console. From the console create a new project and then select Enable APIs and Services.
Enabling the Calender API
The Enable APIs and Services page allows you to search for APIs to enable. We need to search for the calendar API and select it to be added to our project.
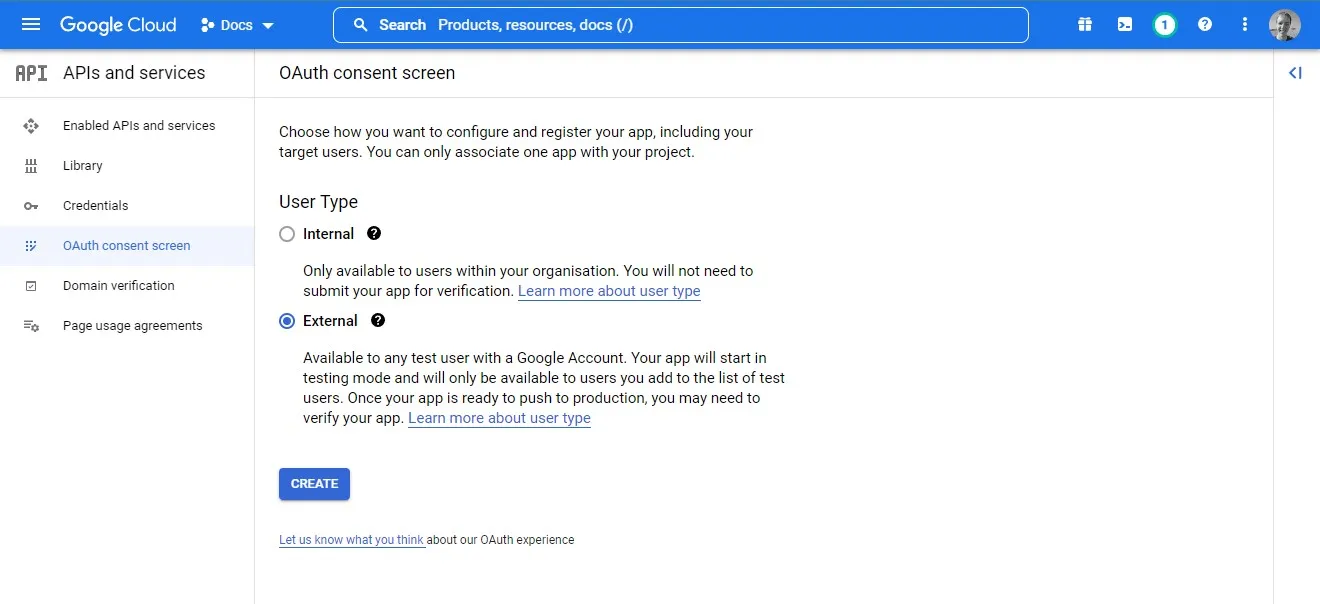
Consent Screen
Now the API has been added we need to configure it. We will start by configuring the OAuth consent screen by selecting External and then on the following screen completing the mandatory contact information.
For reading the calendar API events will just need a single scope /auth/calendar.readonly which we can select from the list. If you need others you can come back and add them at any time.

The third and final step is to add test users. Initially while the app is unverified only users in this list will be able to use the app. For testing add your own accounts to this list.
Credentials
Next we need to gather some credentials to use in our application. As we will be using a server-side flow will use a Client ID and Secret.
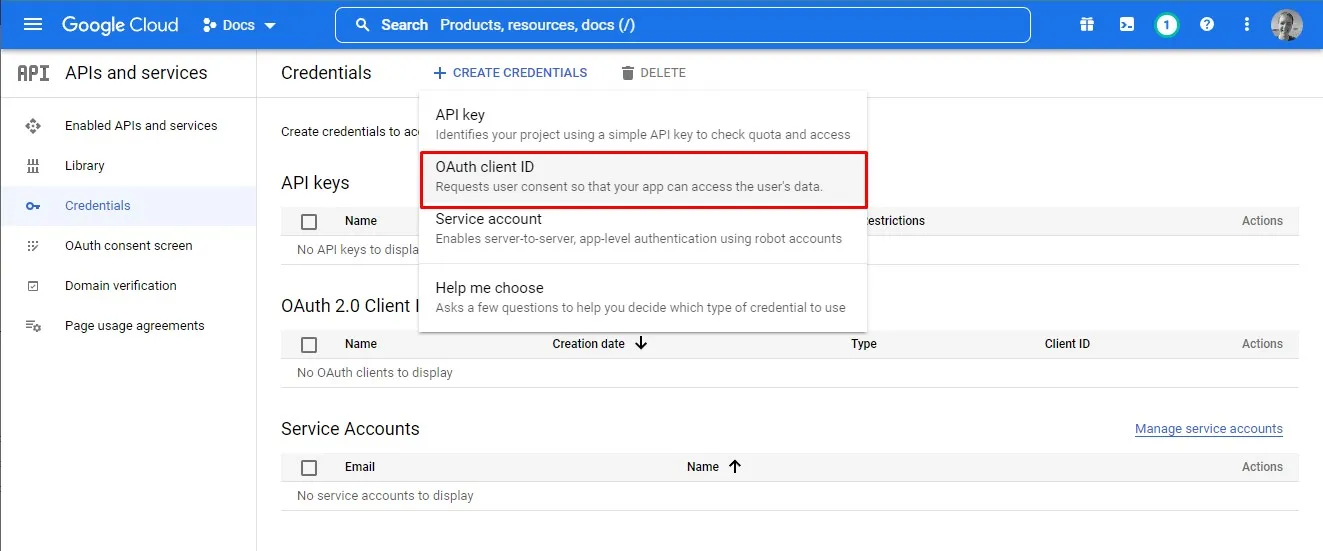
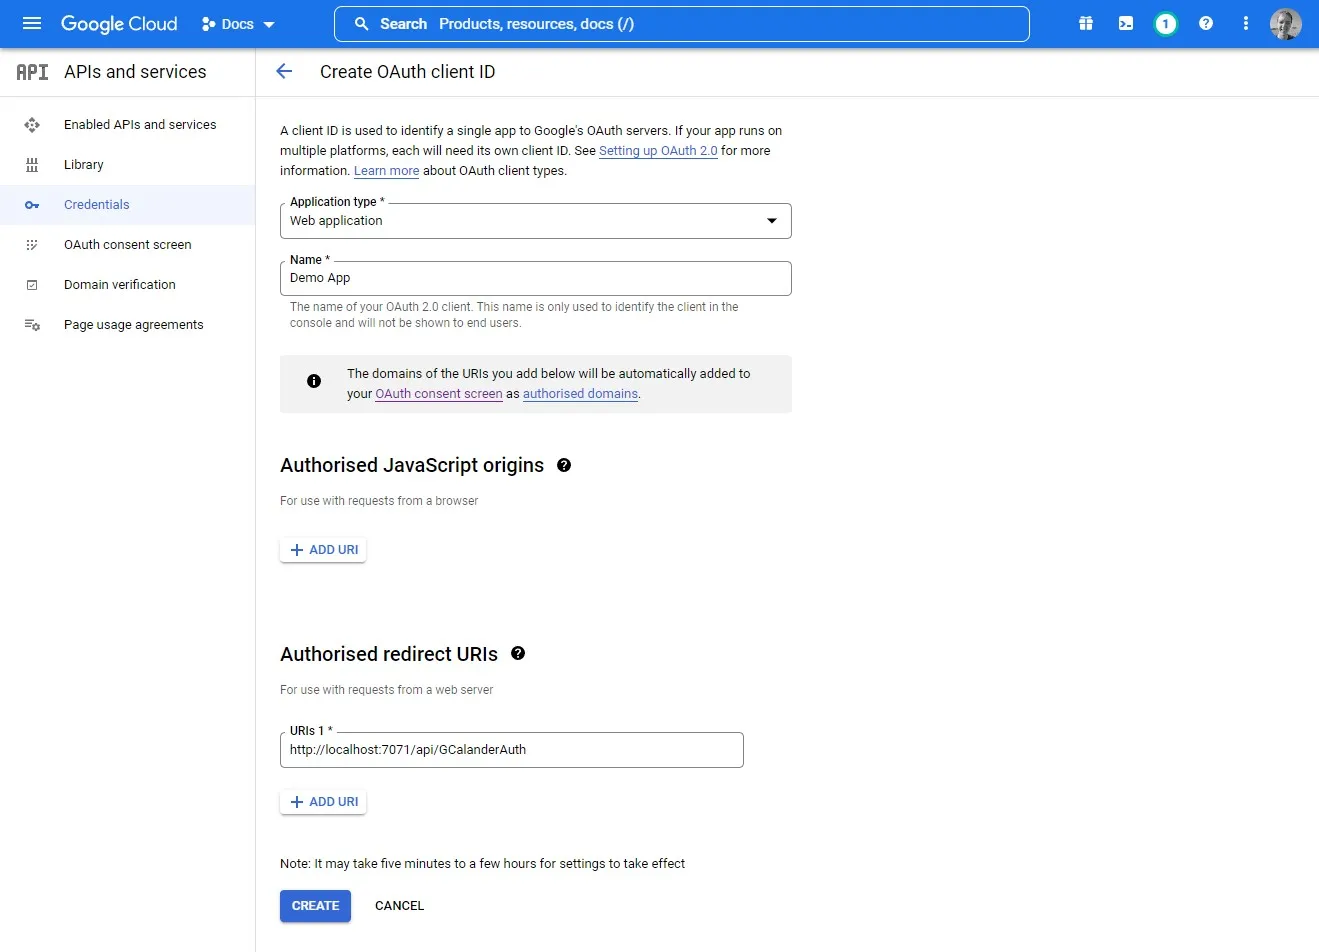
As we create the new Client ID, we are prompted to enter an authorised redirect URL. This is the URL that users will be redirected to after consent is given. For us this will be the URL of our Azure function that handles the authentication flow. If you don’t know the URL at this point you can always come back and add it in later. You can also add in multiple URLs to support both local development and production.
Make sure you take a note of the ClientID and secret as these will be needed later in our Azure functions.
Authentication Flow Function
The first function we’re going to create is the authentication flow function. We could split this logic into two separate functions however as there is not much code, I have decided to keep it together.
Project Set Up
After creating our JavaScript Azure function, we need to install 3 NPM packages. The first is the Google API, the second is to access key vault where we will be storing our tokens and finally azure identity, to auth with key vault.
npm install googleapis
npm install @azure/arm-keyvault
npm install @azure/identity
The Function Code
const { google } = require("googleapis");
const { DefaultAzureCredential } = require("@azure/identity");
const { SecretClient } = require("@azure/keyvault-secrets");

module.exports = async function (context, req) {

  //Create the google OAuthClient
  const oauth2Client = new google.auth.OAuth2(
    process.env["ClientID"],
    process.env["ClientSecret"],
    process.env["AuthFunctionUrl"]
  );

  let nextRedirectUrl;

  if(!req.query.code)
  {
    //When we don't have a code must be first request
    const scopes = ["https://www.googleapis.com/auth/calendar.readonly"];

    nextRedirectUrl = oauth2Client.generateAuthUrl({

      //offline access allows us to get a refresh_token that we can use later
      access_type: "offline",
      scope: scopes,
      include_granted_scopes: true,
      //forces a refresh token every time
      prompt: "consent",
    });

  }else{

    //now we have returned get access and refresh tokens
    let { tokens } = await oauth2Client.getToken(req.query.code);

    //Save tokens in KeyVault (in real world you want unique keys per user)
    const credential = new DefaultAzureCredential();
    const url = `https://${process.env["KeyVaultName"]}.vault.azure.net`;

    const client = new SecretClient(url, credential);

    await client.setSecret("refreshToken", tokens.refresh_token);
    await client.setSecret("accessToken", tokens.access_token);

    //oauth2Client.setCredentials(tokens);
    nextRedirectUrl = process.env["SuccessRedirectUrl"]
  }

  context.res = {
    status: 302,
    headers: { "location": nextRedirectUrl },
    body: null,
  };
};
The azure function starts by setting up the Google OAuth client with the Client ID and Secret we gained during ClientID registration. The return URL (AuthFunctionUrl) must match both the functions URL and the URL that we entered in the Google API console.
If the function is accessed without a code query string parameter, we assume that we need to redirect to the consent screen so build up a URL and redirect to it.
Once the user has consented, they will once again be redirected back to this Azure function. This time a code query string parameter will be present and we fall into the else section of the function.
Now that we have a code, we can convert it into a set of tokens. With the two tokens we need to store them for use in the next Azure function while we read the calendar items.
In this sample I have decided to store the tokens in key vault although you could choose another storage mechanism. If you are using key vault then create a new key vault resource and place the name in the local.setting.json. For authentication to key vault, I am using the Default Azure Credentials. This means if we have logged in to the Azure CLI then we will also be authenticated with the key vault. In a production environment or when hosted in Azure we could then we can use a manage identity.
Finally, after storing the tokens, we redirect the user back to the main website.
Timer Function
Now we have a token we can access the user’s calendar. For this example, I have decided to do this on a timer trigger to list out the next 10 events coming up. You could of course use any of the APIs that you have been granted consent for.
In the function we start by once again creating the Google OAuth client providing the same Client ID, Secret and return URL. We then read our previously saved refresh and access tokens from key vault. Once we have our tokens, we can set these on the OAuth Client to allow access to the APIs. The client is built so if the access token has expired it will automatically use the refresh token to update. When these are updated, we are notified and can resave them back to key vault.
Finally, we are ready to use the Google Calendar API. This section of the code comes directly from the Google calendars API quick start guide using the OAuth token it reads the next 10 events.
const { DefaultAzureCredential } = require("@azure/identity");
const { SecretClient } = require("@azure/keyvault-secrets");
const { google } = require("googleapis");

module.exports = async function (context, myTimer) {

  //Create the google OAuthClient
    const oauth2Client = new google.auth.OAuth2(
       process.env["ClientID"],
       process.env["ClientSecret"],
      process.env["AuthFunctionUrl"]
    );

    //Read tokens in KeyVault (in real world you want unique keys per user)
    const credential = new DefaultAzureCredential();
    const url = `https://${process.env["KeyVaultName"]}.vault.azure.net`;

    const client = new SecretClient(url, credential);
    const refreshToken = (await client.getSecret("refreshToken")).value;
    const accessToken = (await client.getSecret("accessToken")).value;


    oauth2Client.setCredentials({
        refresh_token: refreshToken,
        access_token: accessToken
    });

    //Once the client has a refresh token, access tokens will be acquired
    //and refreshed automatically in the next call to the API.
    //If the application has a status of 'Testing' and the consent screen is
    //configured for an external user type, causing the token to expire in 7 days
    oauth2Client.on('tokens', (tokens) => {
        if (tokens.refresh_token) {
            client.setSecret("refreshToken", tokens.refresh_token);
            client.setSecret("accessToken", tokens.access_token);
            console.log("Refresh token updated");
        }
        console.log(tokens.access_token);
        access_token = tokens.access_token;
      });

    //Now read items in the first calender
    //code from https://developers.google.com/calendar/api/quickstart/nodejs
    const calendar = google.calendar({version: 'v3', auth: oauth2Client});
    calendar.events.list({
        calendarId: 'primary',
        timeMin: (new Date()).toISOString(),
        maxResults: 10,
        singleEvents: true,
        orderBy: 'startTime',
    }, (err, res) => {
        if (err) return console.log('The API returned an error: ' + err);
            const events = res.data.items;
            if (events.length) {
                console.log('Upcoming 10 events:');
                events.map((event, i) => {
                    const start = event.start.dateTime || event.start.date;
                    console.log(`${start} - ${event.summary}`);
                });
        } else {
            console.log('No upcoming events found.');
        }
    });
};
Summary
Reading the Google Calendar API after gaining consent from the user can be done using only Azure functions. In this post we looked at how we can initially generate a redirect URL handle the response and then finally use the tokens to read calendar entries.