Controlling Azure DevOps Pipelines through Teams Integration and Manual Intervention Steps
Azure DevOps has the option to create a manual intervention step in your pipeline. This will pause the running pipeline and send an e-mail with a link to approve the continuation. However emails are not always the best option and can be missed, so in this post, we’re going to look at how we can build a manual intervention step that prompts you in Microsoft teams. With this approach you will also be able to choose to either continue or reject the request without ever leaving Teams.
The Design
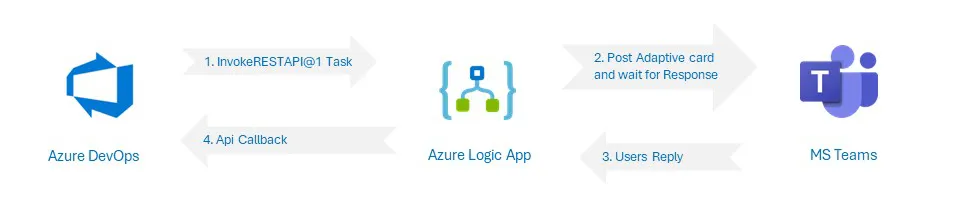
We can send an API request as part of an Azure pipeline and wait for a call back to continue. We cannot however, easily respond directly in teams with the complex callback required. Using a logic app in between pipelines and teams, we can make a message post into a team’s channel and wait for a simple response before sending a more complex response back to our Azure pipeline.
Azure DevOps Pipeline
The following YAML is a simple pipeline that were going to use for this demonstration. It is split into three distinct jobs. The first and last job would typically be a build process or another step. In this case we’re just printing a simple message to demonstrate how the process works.
jobs:
- job: BeforeTasks
  displayName: 'Before Tasks'
  checkout: none
  pool:
    vmImage: 'ubuntu-latest'
  steps:
  - bash: echo "Hello I am running!"
    displayName: 'Run a one-line script'

- job: Wait
  displayName: 'Wait for Confirmation'
  dependsOn: BeforeTasks
  pool: server
  steps:
  - task: InvokeRESTAPI@1
    displayName: 'Invoke REST API: GET'
    inputs:
      serviceConnection: 'LogicApp'
      method: POST
      waitForCompletion: 'true'

- job: AfterTasks
  dependsOn: Wait
  displayName: 'After Tasks'
  checkout: none
  pool:
    vmImage: 'ubuntu-latest'
  steps:
  - bash: echo "Finished!"
    displayName: 'Run a one-line script'
Our wait pipelines job is where the important logic happens in this example. We’re going to be using an InvokeRESTAPI@1 task to make an API call to our logic app and await a callback.
Just like a manual intervention step the Invoke REST API task only works on an agentless job, where the pool is marked as server. The advantage of this is that while we’re waiting for the callback, we are not holding one of our agents. However, the downside is that the wait must be split into a separate pipelines job.
For this to work we need to specify three things in the InvokeRESTAPI@1 task; the name of a serviceConnection that we will create later, the HTTP method and finally the waitForCompletion flag. The wait for completion flag turns this task, from one that completes instantly, into one that holds and waits for a callback to complete.
Logic App
As we need to perform a callback to Azure DevOps in a very particular format we cannot connect directly to teams. We could use any type of application to do this and services like an Azure function would be well suited. I have however decided to use a consumption plan logic app. The reason for this is that it handles authentication with teams using a simple workflow and zero code.
Once complete our logic app will look like this:
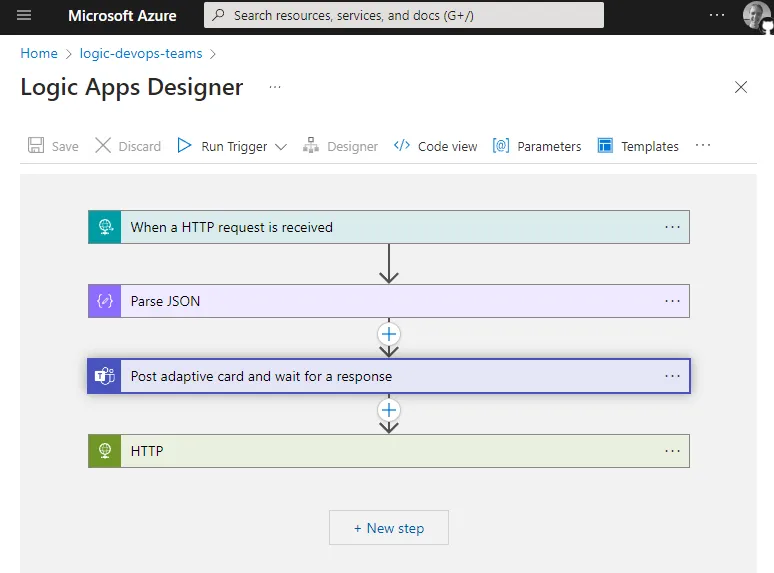
To get started first create a consumption plan logic app using a HTTP trigger. Once saved this will give us a URL that we can use in the service connection. There is no need to provide a body schema for this step.
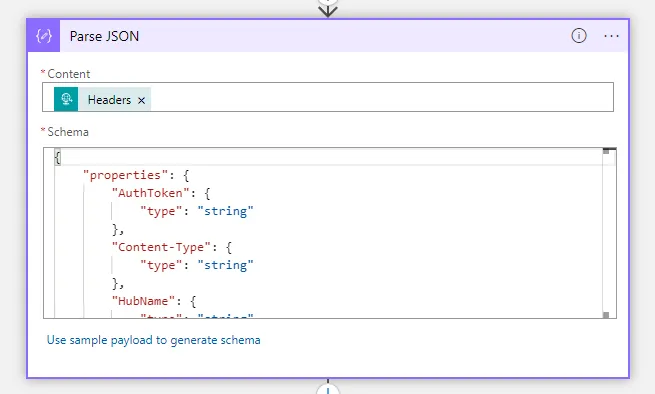
Parse Headers
When our pipeline triggers the logic app REST endpoint it will send several properties as HTTP headers. These are needed when we make the call back, therefore we need to parse the json headers so we can use them later. Add a Parse Json block to the logic app and select Headers from the request step as the content. For the schema we can use the following JSON.
{
    "properties": {
        "AuthToken": {
            "type": "string"
        },
        "Content-Type": {
            "type": "string"
        },
        "HubName": {
            "type": "string"
        },
        "JobId": {
            "type": "string"
        },
        "PlanId": {
            "type": "string"
        },
        "PlanUrl": {
            "type": "string"
        },
        "ProjectId": {
            "type": "string"
        },
        "TaskInstanceId": {
            "type": "string"
        },
        "TimelineId": {
            "type": "string"
        }
    },
    "type": "object"
}
Linking to Teams
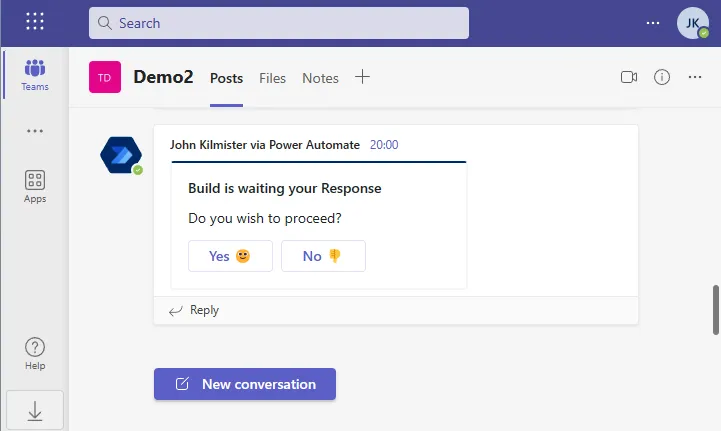
Next, we will add a block that allows us to communicate with Microsoft Teams. Find and add the block labelled Post adaptive card and wait for a response. Once this is added you’ll be prompted to log into Microsoft Teams and give authorization for it to post.
You can select to post in a channel a group chat or a direct message to a user in a chat with flow bot. Depending on your option of where to post you will then have a set of further options. In our case we’re going to post to a teams channel.
The message field must be populated with JSON that describes the adaptive card to be shown.
Adaptive Cards
We can create rich teams messages and interactive cards by using the adaptive cards format. If you have not used or seen this before you can learn more at https://adaptivecards.io/. There is also a web based designer which allows you to build the cards and generate the JSON needed.
It is worth noting that in order to use the adaptive cards with Microsoft teams you need to set a target version of 1.2 or lower. Other features such as data binding are also not available when using these adaptive cards with teams.
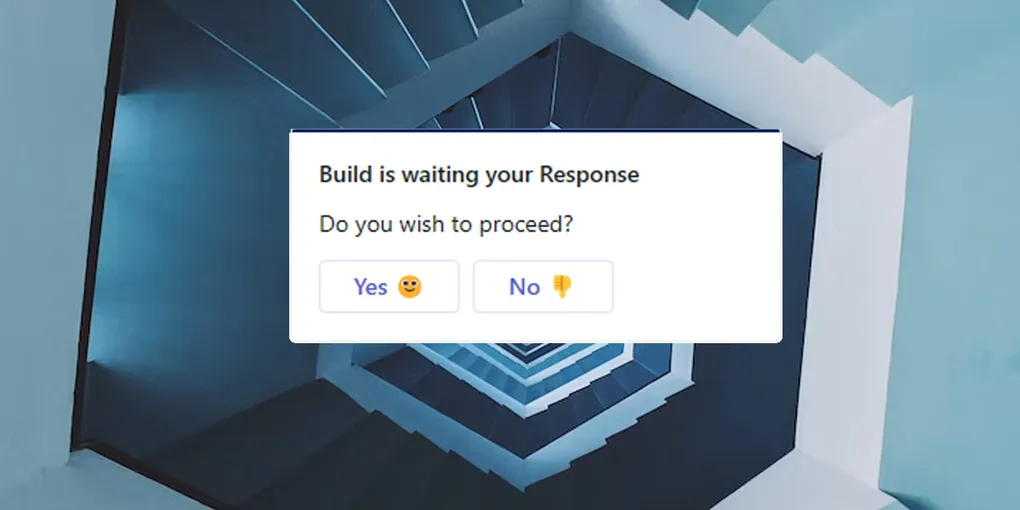
For now here is the JSON I used to create my card.
{
    "type": "AdaptiveCard",
    "body": [
        {
            "type": "TextBlock",
            "size": "Medium",
            "weight": "Bolder",
            "text": "Build is waiting your Response"
        },
        {
            "type": "TextBlock",
            "text": "Do you wish to proceed?",
            "wrap": true
        }
    ],
    "$schema": "http://adaptivecards.io/schemas/adaptive-card.json",
    "version": "1.0",
    "actions": [
        {
            "type": "Action.Submit",
            "title": "Yes 🙂",
            "id": "succeeded"
        },
        {
            "type": "Action.Submit",
            "title": "No 👎",
            "id": "failed"
        }
    ]
}
For our process to work we need two action submit buttons as part of the card. We will use the ID of the action button as the states to return to our pipeline. You should be able to see in my example JSON that I have succeeded and failed as my two buttons IDs.
I have not included any of the details from the pipeline build in the card. We could make additional API calls into the Azure DevOps API to gain information like the pipelines title to enrich the adaptive card.
The logic app when executing, will wait at this point until the response is returned from Microsoft Teams.
The Callback
The final step of the logic app and probably the most complex is to return the callback to Azure pipelines. This is done by adding a HTTP action block to the logic app.
The documentation explains that we can use the header values to build the return URI. We must also populate the body with the job ID and the task ID from the headers. Finally, the body should include the result either succeeded or failed. In our case we’re going to read this from the response of the adaptive card.
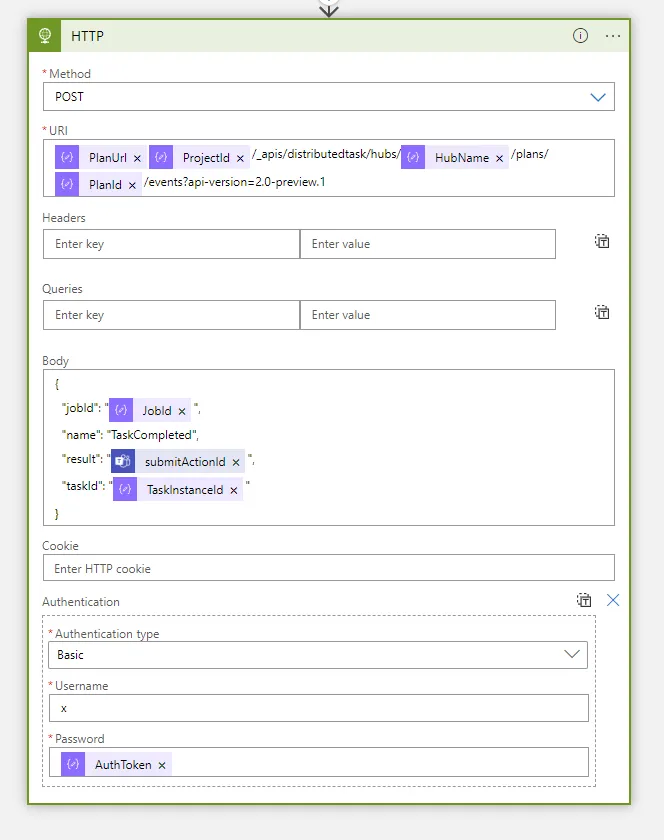
The user name can be set to any value as it is ignored, while the password can be found in the header.
It is possible to send other update messages back to pipeline and these can be seen in the documented examples however I have not done this here to keep this things simple.
If you have not done already, save your logic app. Then expand the HTTP request block and make a copy of the URL ready for setting up the Service Connection.
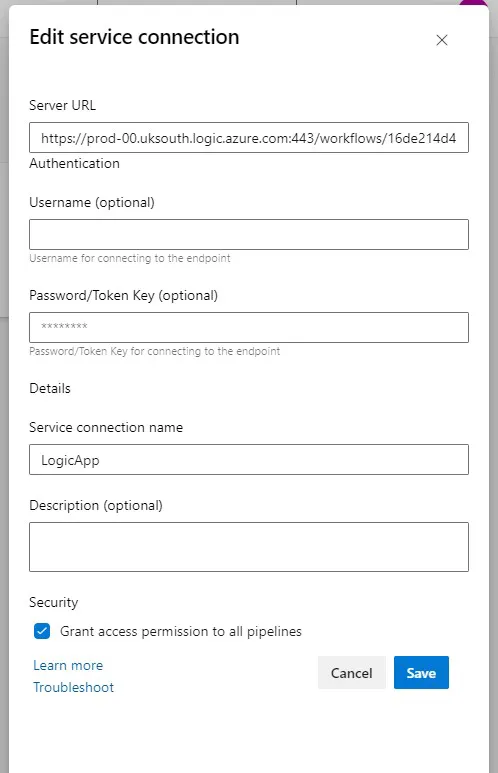
Service Connection
The final task is to attach the logic app to the pipeline through the creation of a Service Connection.
From your project settings page inside Azure DevOps select Service Connections. In the top right-hand corner of the page, you’ll see a New service connection button. Select this and then the Generic connection type.
The generic service connection only requires the server URL (the value you copied from your Logic app) and the Service connection name. No username or password is required.
Testing
Now this is complete, you should be able to test your pipeline. You will see the pipeline pause and a message posted in teams. If you look inside the logic app, you will also see it’s paused waiting for the reply. Finally, once you do reply in teams, the logic app will resume and pass the callback to Azure pipelines.
Summary
In this post we have looked at how we can create a manual intervention step in Azure DevOps that prompts you in Microsoft teams. This is a great way to get a response from a user without having to leave teams.
We talked over how we need to create the pipeline, logic app and finally a service connection.
Hopefully this has given you some ideas on how you can use this technique in your own pipelines.
Title Photo Background by Faris Mohammed on Unsplash