Azure Custom Roles Following Least Privilege Best Practices

Azure permissions are controlled through Role Based Access Control (RBAC) that can be applied at many levels through the use of users, groups and roles. There are over 250 built in roles each that give a select group permissions.
When a user requires access to a resource it is tempting to quickly grant them one of more general built in roles such as Reader, Contributor or even Owner. However these roles are built up of multiple permissions that go well beyond what may be needed by that user to perform the task and inturn can introduce a security risk.
The principle of least privilege states that all users and applications should have the minimum level of access they need to perform their job leading to improved security and system stability.
In this post we will cover how we can use fine grained built in roles and custom roles to satisfy the principle of least privilege and secure our Azure resources.
Built in Azure Roles
Before looking at custom roles it is worth reviewing the many built in roles to see if any fit your requirements. There are over 250 roles and addition to Reader, Contributor and Owner including many specialist roles covering tasks from CosmosBackupOperator to Storage Blob Delegator.
Before you select a built in role you should review each and the permissions it grants in the official documentation to understand what access is being given to ensure only the access needed is granted.
Even with this many built in roles there are many cases where a suitable specialist role is not available and this is where custom roles can be used.
Azure Lock Permissions
Azure Locks are a feature that allow you to add a lock to a resource to prevent deletion even if the user has delete permissions. This is particularly useful to prevent accidental deletion of writeable or critical resources such as databases. Please note however there are some caveats to using azure locks which are beyond the scope of this article and can be found in the offical documentation.
There are scenarios where you may want some users to be able to add these locks when creating resources. If we look at the documentation on the locks feature to manage locks you can quick see you need permissions that include either Microsoft.Authorization/* or Microsoft.Authorization/locks/*.
We can look at existing roles either though the documentation or Azure CLI to see the permissions that are granted to see if it includes Microsoft.Authorization/locks.
az role definition list --name 'Contributor'


[
  {
    "assignableScopes": [
      "/"
    ],
    "description": "Grants full access to manage all resources, but does not allow you to
assign roles in Azure RBAC, manage assignments in Azure Blueprints, or share image galleries.",
    "id": "/subscriptions/000000000000000000000/providers/Microsoft.Authorization/roleDefinitions/b24988ac-6180-42a0-ab88-20f7382dd24c",
    "name": "b24988ac-6180-42a0-ab88-20f7382dd24c",
    "permissions": [
      {
        "actions": [
          "*"
        ],
        "dataActions": [],
        "notActions": [
          "Microsoft.Authorization/*/Delete",
          "Microsoft.Authorization/*/Write",
          "Microsoft.Authorization/elevateAccess/Action",
          "Microsoft.Blueprint/blueprintAssignments/write",
          "Microsoft.Blueprint/blueprintAssignments/delete",
          "Microsoft.Compute/galleries/share/action"
        ],
        "notDataActions": []
      }
    ],
    "roleName": "Contributor",
    "roleType": "BuiltInRole",
    "type": "Microsoft.Authorization/roleDefinitions"
  }
]
As we can see above the Contributor role typically used to create resources explicitly denies access to Microsoft.Authorization/*/Write and Microsoft.Authorization/*/Delete. This means although users with the contributor role can see the locks they would not be able to create or delete them.
Looking at all the other built in roles only Owner and User Access Administrator roles to give write access to Microsoft.Authorization/*. If we look at all the permissions under Microsoft.Authorization this includes policies, user roles and much more which we would not want to give access to in this case.
This is where we need a custom role which can be used to allocate out the just permissions needed to manage locks. In the rest of this article we will see how to create an Lock Reader and Lock Contributor role.
Designing a Custom Role
Custom roles are a group of permissions and the first task when designing a role is identify the required permissions you need. The resource provider operations documentation gives a full list of every permission however resource level documentation is often the best place to start.
Permissions can be allocated in groups with wildcards so Microsoft.Authorization/locks/* will give access to everything under locks which in this case is read, write and delete. You can also use wildcards in the middle of the permission to give different set of access. For example Microsoft.Authorization/*/write gives only write access to everything in Microsoft.Authorization.
Remembering the principle of least privilege it is better to create smaller more targeted roles that fulfil a single purpose rather than large roles, remembering people can be allocated a collection of roles.
Creating a Custom Role
Azure custom roles can be created in the Azure CLI, AZ PowerShell, Rest API or Azure Portal. Each role is set with assignable scope to then be available to use in one or more Subscriptions or a Management Group level which then applies to the subscriptions within.
The account performing the creation will however need the Microsoft.Authorization/roleDefinitions/write permission to create a new role.
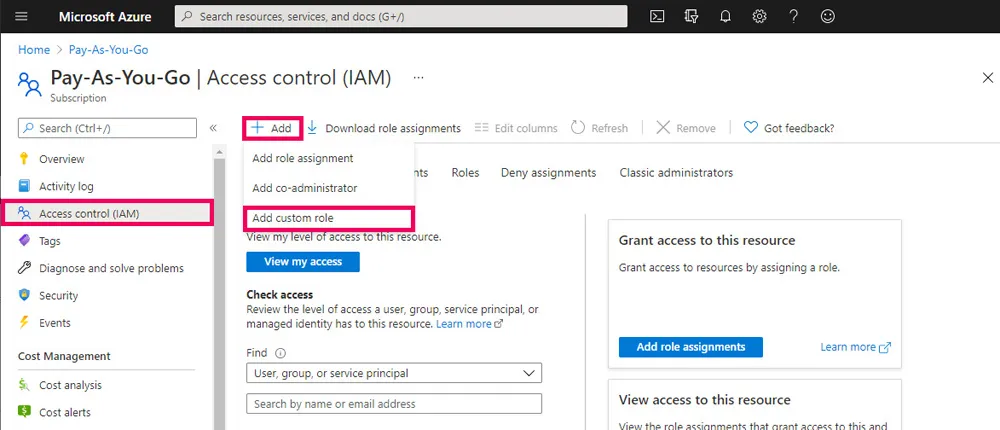
To create a role in the Azure portal navigate to a Subscription or Management Group and select Access Control (IAM) then Add and Add Custom Role. From here you can set the name, permissions and assignable scopes.
Custom roles are then viewable under the Roles tab which can be filtered to show only custom roles.
Alternatively custom roles can be added using the Azure CLI run the following:
az role definition create --role-definition '{
    "Name": "Lock Reader",
    "Description": "Grants read access of resource locks",
    "Actions": [
        "Microsoft.Authorization/locks/write"
    ],
    "AssignableScopes": ["/subscriptions/00000000-0000-0000-0000-000000000000"]
}'

az role definition create --role-definition '{
    "Name": "Lock Contributor",
    "Description": "Grants full access to manage locks on resources",
    "Actions": [
        "Microsoft.Authorization/locks/*"
    ],
    "AssignableScopes": ["/subscriptions/00000000-0000-0000-0000-000000000000"]
}'
For more options see the official documentation
Applying a Custom Role
Once it has been defined then the role will be assigned out the new roles to users, groups, and service principals from within a management group, a subscription or resource group. Once again you can do this using Azure CLI, AZ PowerShell, Rest API or Azure Portal.
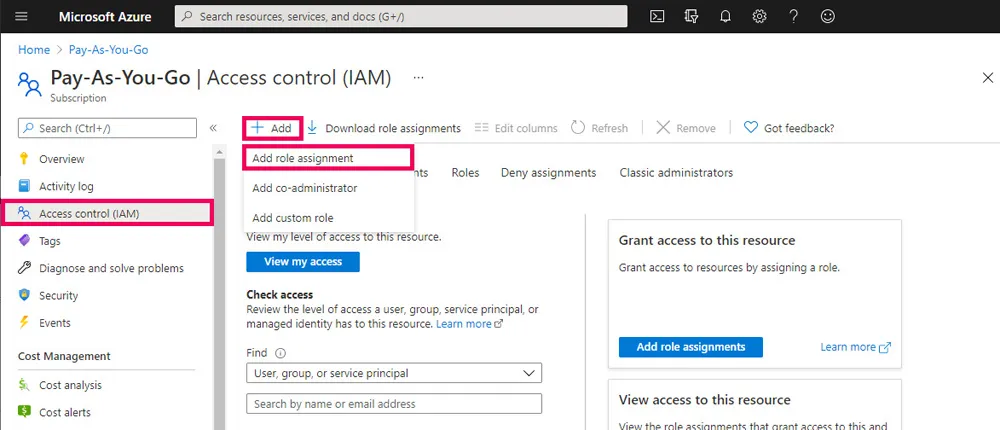
Assigning a custom role is the same as assigning any built in role. To assign a custom role in the Azure portal navigate to a Subscription, Management Group or Resource Group and select Access Control (IAM) again and then Add. This time select Add Role Assignment. From here you can set the name of the role and the group or user to assign the role to.
Alternatively roles can be assigned using the Azure CLI run the following:
az role assignment create --assignee 00000000-0000-0000-0000-000000000000
--role "Lock Contributor" --scope /subscriptions/00000000-0000-0000-0000-000000000000
For more options see the official documentation
Summary
Azure permissions via Role Based Access Control are very flexible though we may need to create custom roles to ensure the principle of least privilege.
In this post we looked at the built in roles that are provided in Azure and then looked inside these at the permissions they grant. In order to satisfy the principle of least privilege, using the example of an azure lock contributor and azure lock reader we create custom roles and looked at how to apply them.
This post was created as part of the #AzureSpringClean 2021. I encourage you to check out the other authors and posts in this series.