An Introduction to Running and Deploying Backstage on Azure
For the last few months, I’ve had the opportunity to configure and use Backstage with Azure. In this post we will cover what Backstage is, how we can use the plug-ins to integrate into Azure and host it on the platform.
What is Backstage
A deployed version of Backstage creates your team a developer portal website to bring together team documentation. The contents of the portal are independently maintained by individual teams across an organisation alongside the code in the relevant GIT repos. By scanning your DevOps account, the content can automatically be brought into a single backstage website. A demo website can be found on the office backstage site.
Originally an internal project at Spotify, Backstage is now an open source v1.1 project and part of the Cloud Native Computing Foundation. Backstage is based on up a plug-in system and at this time out of the box these plug-ins include the Catalog, TechDocs and TechRadar. As you will see in this post there are many more plug-ins that can be added to extend it.
The catalogue plug-in allows you to catalog your software components, micro services and APIs using a set of YAML files. These allow you to document the ownership and relationships of components along with bringing in any Swagger docs you may already have.
The Tech Docs plug-in allows documentation in markdown to live next to your code then be built into a static site. When brought together in backstage this becomes fully searchable along with all other ingested documentation. In addition to this, backstage allows other plug-ins integrating into systems like continuous integration and monitoring/alerting etc, generally extending its functionality to become a single portal for developers.
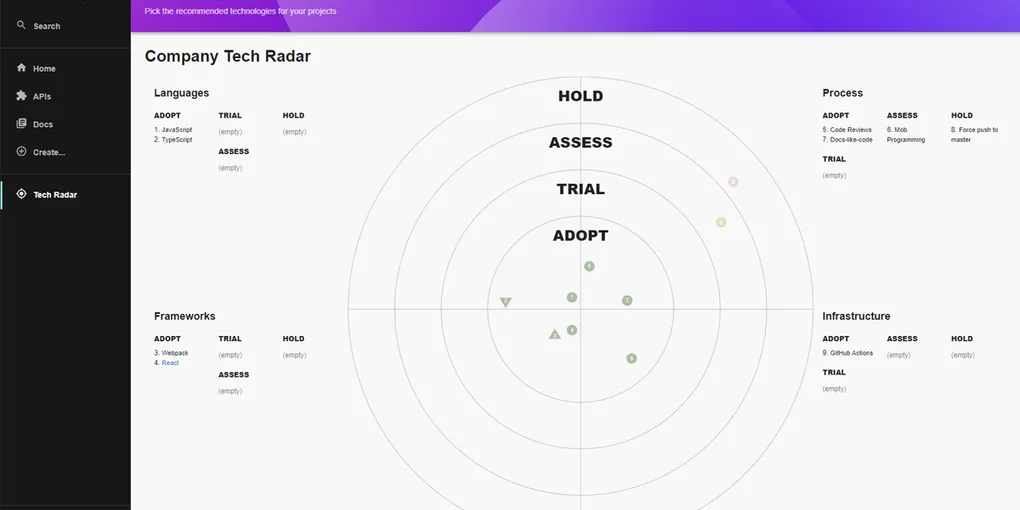
The tech radar plug-in allows you to create a guide in the style of thought works tech radar to show the state of your current tech stack. It can show what developers should be using, what is in trial and what is on hold.
Personally, I have found these work well with the Team Topologies concepts of autonomous teams and team contracts. It helps solve the problem of still needing to share architecture guidance while maintaining team autonomy. Backstage also fits well with the “everything as code” concepts and the idea that if it changes together, it should live together.
In this post we are going to focus on deploying Backstage to Azure and some of the useful Azure related plug-ins. Therefore I won’t cover any more at this point on the features. Do however checkout the project page and the live demo along with details on how it is being used at Spotify.
Getting Started
Backstage is a react application that comes with code to build it into a docker container. They don’t prebuild a docker image as the expectation is that you will want to customise backstage code and extend it before deploying.
I have found that going through the backstage getting started guide relatively straight forward, after a few prerequisites then it was a simple initialization command to set up the project. Following this it was a case of adding in configuration before running it locally. There is a good guide on getting started so I won’t repeat the core of it here.
Configuration
Backstage is configured by updating the app-config.yaml file. It is in here you will configure the setting for each of the plugins. An app-config.local.yaml is also provided (excluded from git) and an app-config.production.yaml for production. In production systems we can use environment variables for the secrets then set these in Azure as application configuration. As we talk over integrating into Azure it is primarily these files we will be updating.
Azure, Azure Devops and the Catalog Plugin
The catalog is one of the few built in plugins and allows a catalog of systems, components, APIs and resources that are built up from yaml configuration files.
You have several options to notify your backstage instance of these.
- Place the files in the backstage deploy. This is quite inflexible though maybe suited for a few key items.
- Allow users to register their components using the web UI.
- List out the URLs of Git repos in which it will search for a
catalog-info.yamlfile. This however requires you to add new locations manually to the config file. - Scan all Git repositories in your organisation from GitHub, Azure DevOps or other locations
To configure these options with Azure DevOps or GitHub all you need to do it create a Personal Access Token then add it to the app-config.yaml. For local dev you can override it with a value in the app-config.local.yaml.
integrations:
  azure:
    - host: dev.azure.com
      token: ${AZURE_TOKEN}
The final scanning option allow teams to add a catalog-info.yaml into the root of their repository. This allows independent teams to have their component automatically added to backstage. If you choose this it is worth turning the catalog into read-only mode to prevent people also adding components via the UI.
To enable scanning your DevOps repository it requires an additional plugin to be installed. This is fully documented on the Backstage site. As with most additional plugins they are NPM packages that you add (to either the front or backend) and some configuration or jsx edits.
The Components, Systems and APIs in your catalog show owners which can be users or groups. Users and Groups can be defined in YAML files, however you can also link in to Azure AD via MS Graph API and import these users and groups. This is done via the MS Graph plugin which allows you to filter and edit the users are they are imported.
Azure Devops Plugin
Each component in the backstage catalog has a dedicated page in Backstage. This includes tabs that show the relationships, core data and documentation. It is possible to add in a set of Azure DevOps plugins to show open pull requests and pipeline builds in the component page.
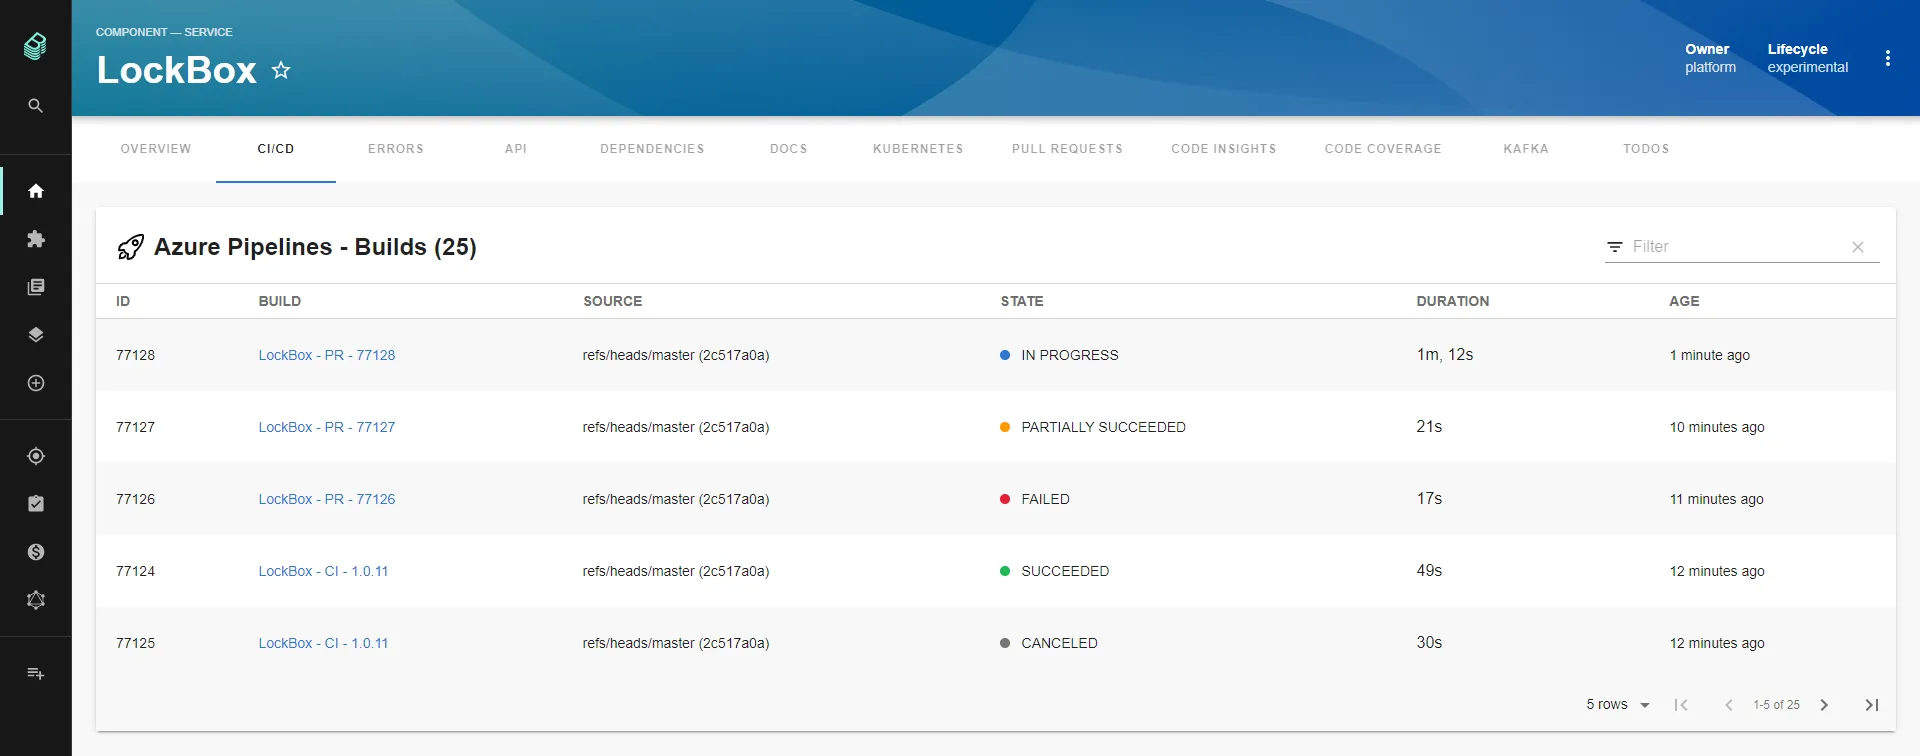
To add this functionality you need to add both the Azure DevOps Backend and the Azure DevOps Frontend plug-ins. As with adding most plugins, this requires you to modify files in your backstage project. The links for both projects contain the full install guide.
Once installed, the configuration will need be extended to add a Personal Access Token, however this time in a new location in the settings dedicated for use with this plugin.
azureDevOps:
  host: dev.azure.com
  token: ${AZURE_TOKEN}
  organization: companyorg
Personally I have found adding this has really helped make backstage a hub for all developer information.
Building Backstage
Once you have configured your install of backstage you will want to deploy it. This is a case of building the docker image.
This is covered in the backstage guide. There is a docker file that you will have as part of the create-app. In the guide there is also instructions on a multi-stage build so you can do a build on machines that don’t have the prerequisites installed.
Once we have the docker image we can build and push to Azure Container Registry ready for deployment.
yarn build
az acr build -t backstage -f packages/backend/Dockerfile -r youracr .
Hosting in Azure
Azure offers several options for hosting docker containers. We can choose from Azure container instances, containerized web app with Azure App Service, Azure Kubernetes services (AKS) or the recently introduced Azure container apps. Each have their own features and use cases.
To easily attach a domain name with SSL certificate, automatic CI/CD deployment, support authentication an automatic scaling, I have chosen to use an Azure App Service. Azure container apps looked appealing however many of these features are still in preview at the time of writing. While a full Kubernetes cluster was not necessary in my case.
When we create a new AppService it is possible now to select the Docker image from our Azure Container Registry.
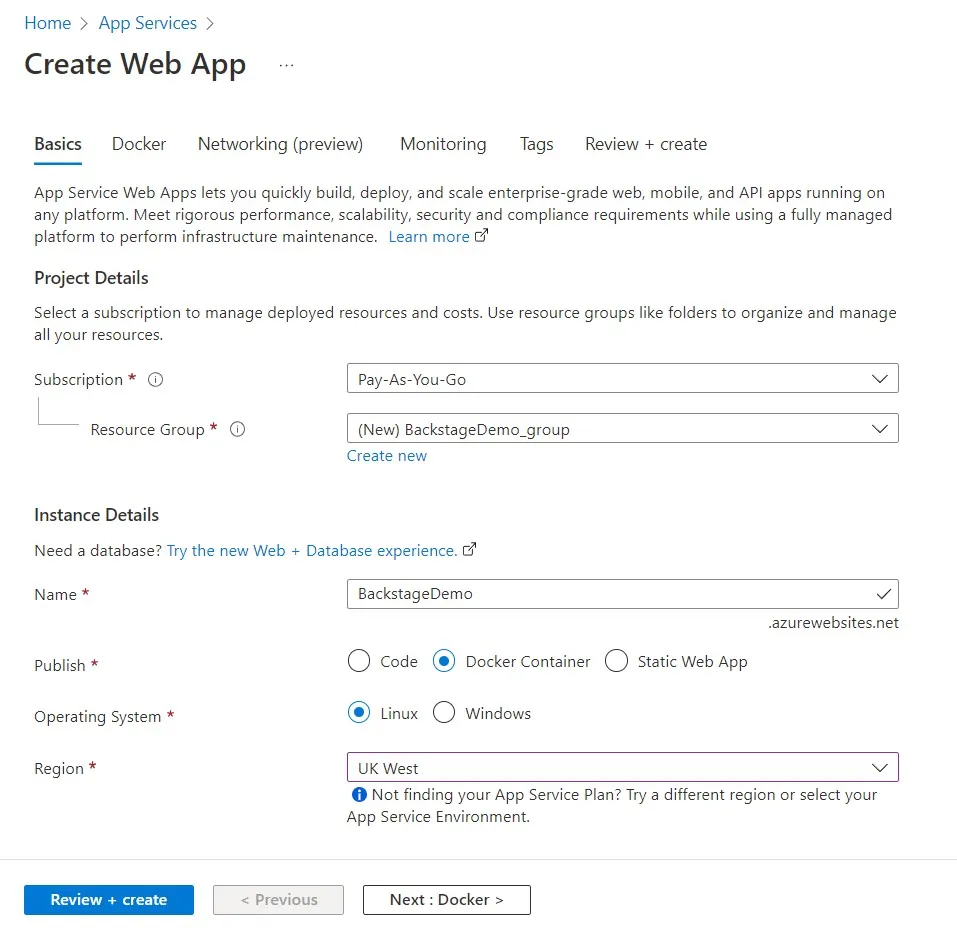
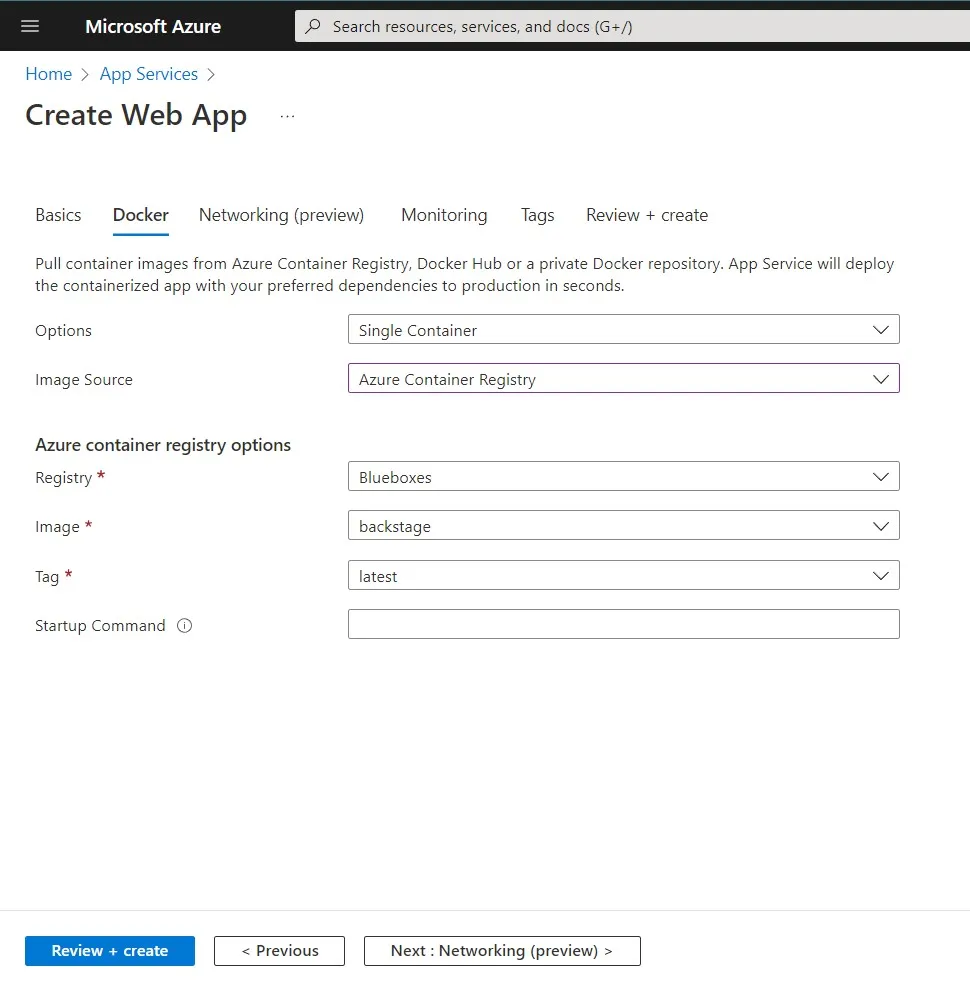
By using this approach each time we push a new version to our Container Registry it will automatically be deployed to this App Service. If you are building your docker image inside Azure Devops or GitHub and pushing the image on code changes, this gives you an easy and full CI/CD process.
We next need to add each of our secrets to the application settings. The backstage backend is set to run on port 7007 so before the application will run. We will also need to add an application setting WEBSITES_PORT to a value of 7007.
The final step is to update your app-config.production.yaml app urls to match the url of your app service. This can either be the azurewebsites.net address or a domain name if you have assigned one. Once you have done this you will need to re-build and push your docker image which will then re-deploy your app.
app:
  baseUrl: https://backstagedemo.azurewebsites.net

backend:
  baseUrl: https://backstagedemo.azurewebsites.net
  listen:
    port: 7007
    host: 0.0.0.0
Security and Auth
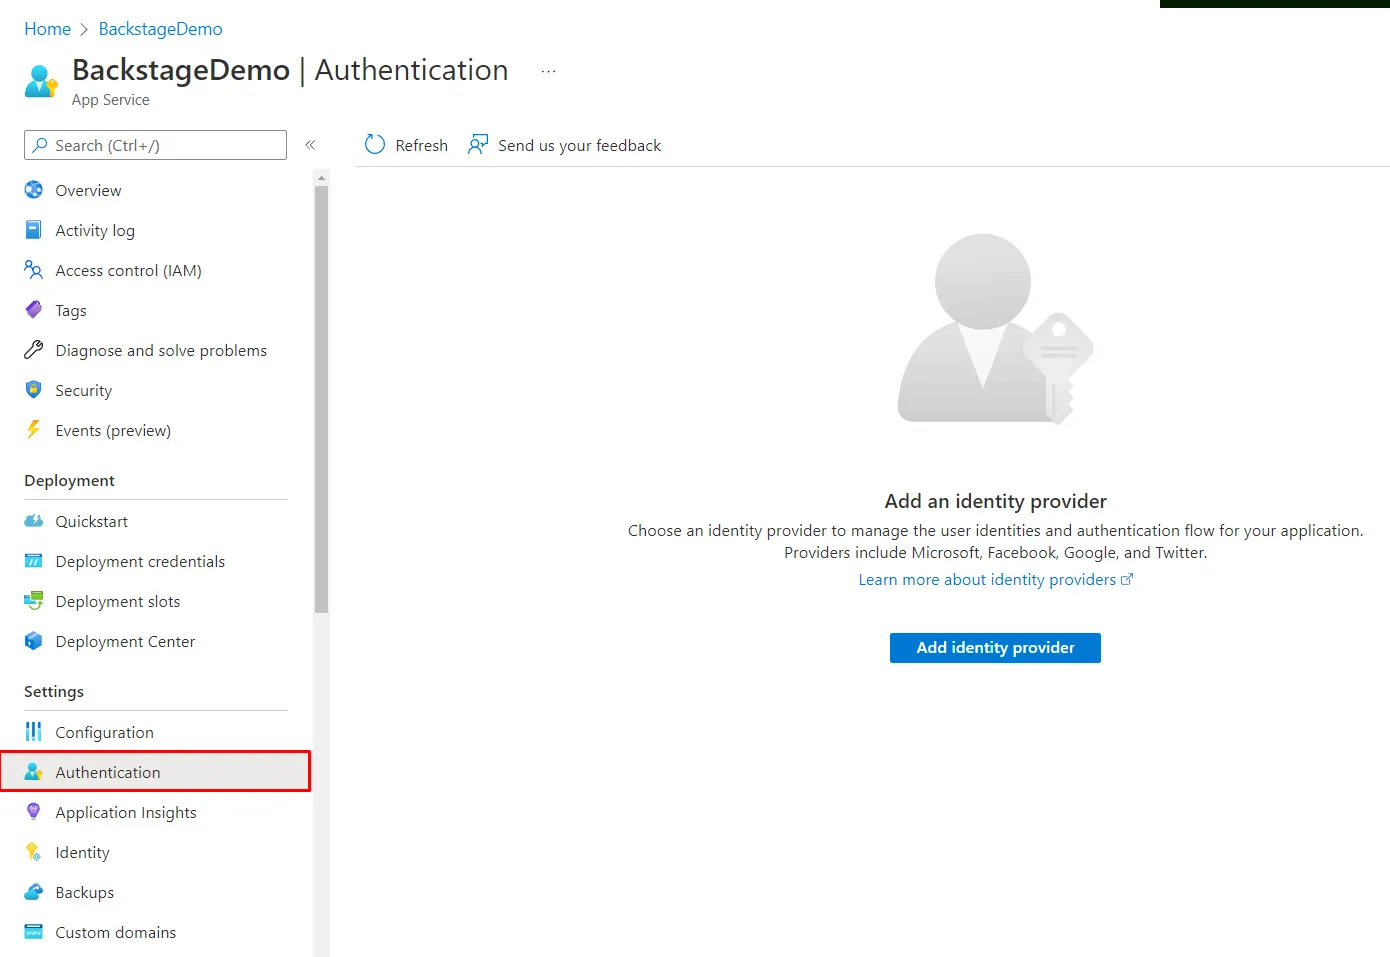
Backstage offer users the ability to log in. We can log in with Azure AD however the documentation makes it clear that although users are redirected to the login page this should not be relied on for security.
“NOTE: Identity management and the SignInPage in Backstage is NOT a method for blocking access for unauthorized users” - https://backstage.io/docs/auth/#sign-in-configuration
We can however, set up authentication on our Azure web app. This can link into Azure AD and ensure that everybody is both authorised and authenticated to access backstage. If you have added a custom domain you will need to add this to the redirect URLs otherwise no special setting are needed.
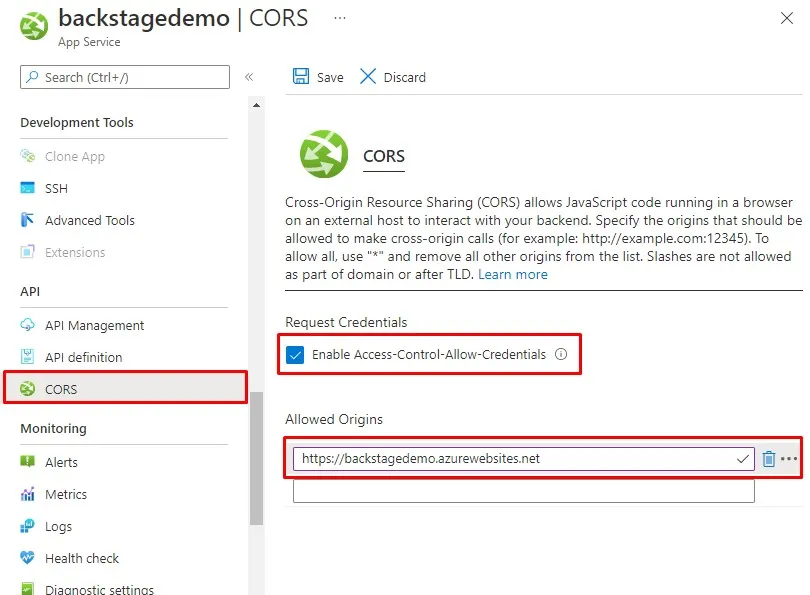
Due to this issue even though we have the API on the same domain as the web ui we need to set CORS. If we do not set this you will get a 403 for any http posts.
Final thoughts
There are many other plugins and customisations that can be made. I have used the home page plugin and several others to bring together existing services we use. Having access to the backstage source code on GitHub has enabled me to create my own plug-ins. Spotify plan to roll out many more plugins soon both free and paid for.
If there has been one thing that has been a challenge it has been upgrading, there is a command to upgrade however you will need to manually edit any files you have in your project for each upgrade. It is recommended that you upgrade often.
That said the support via the discord channel has been incredible with quick response to any questions.
Summary
Backstage has been a great help to allowing individual self-organising teams to document their external contracts. With documentation made in a way the lives alongside the code yet can be brought together in a single web interface and centrally consumed.
The open-source project easily integrates into Azure and in this post we saw how we can build and deploy it of enable the Azure plugins for authentication and for repository scanning.
In this post we covered an over view and I would definitely recommend checking out the official website and giving this a go yourself.